Experiencing dead batteries without a charger within reach might be the most unfortunate incident in 2021, perhaps only next to contracting the coronavirus. I’ve been in that situation, and so have you, and indeed, everyone has faced it at some point.
“But Timmy, all we have to do is borrow our friends’ charger, right?”
Well, sure. But what if your friend also doesn’t have a charger? Or you don’t even have a friend in the first place!
Unfortunately, I can’t help you get a friend. But I can certainly show you how to recharge your devices without a charger. From a little smartphone to a giant car battery, this article will teach you everything you’ll need in an emergency situation.
Using a portable power bank
The most convenient way to recharge a battery is using a portable charger. Today’s market comprises many high-quality and high-powered lithium-ion batteries. Thus making charging them easier than ever. Simply connecting the chargers’ wires to the battery terminal. Just remember:
- Positive (+) goes with positive (+)
- Negative (-) goes with negative (-)
And then voila, your dead battery is now back to life.
Jump starters can also be used as portable power banks. In fact, most of my driver-friends had already forgone their portable chargers and bought an all-in-one jump starter for their vehicles. Almost all jump starters nowadays feature universal USB charging ports. This means they can charge your phones, dashcam, portable espresso makers, etc., you name it. From the size of an iPhone 12 Pro to much larger dimensions, jump starters can be stored in backpacks or your vehicle’s glove box. While the larger models can be transported in the trunk of your vehicle or in your truck, as well as in your garage or workshop.
Read more: Best lithium-ion jump starters: Before you buy »
With just one full charge, not only these lithium-ion-powered jump starters can recharge your smartphone a few times over, but they can also jump-start your vehicle 20 times or so. As incredible as they are, these jump starters do have some shortcomings. Power inverters also work in a similar fashion. They draw 12V power from your car battery and transform it into 110V for your device.
Read more: Best power inverter for car: A mechanic’s guide and review »
Using USB ports
Using a USB port to charge your electronic gadgets is the most simple and convenient way to charge up its lithium-ion battery. Your smartphone, tablet, laptop, even your car’s jump starter, is equipped with a lithium-ion battery to operate. By plugging your device into a USB port connected to a mains power supply and by using your device’s charging cable that fits into the USB port your gadget will have an uninterrupted power supply.
Convenience and fast charging time are the main advantages of using USB ports to charge lithium-ion battery-powered devices. However, there are drawbacks: apart from still requiring a power source, the USB charging cables can cause damage to the lithium-ion batteries. High-voltage fluctuations can cause the lithium-ion battery to increase significantly in heat, resulting in the battery’s cells degrading in performance and structure. Another problem many encounter when using USB ports is damaged USB charging cables: these can cause extra-long charging time can trigger the device to interrupt the charging process and lead the device to enter a safe mode to prevent potential damage. Over time, the lithium-ion batteries can leak, and this fails.
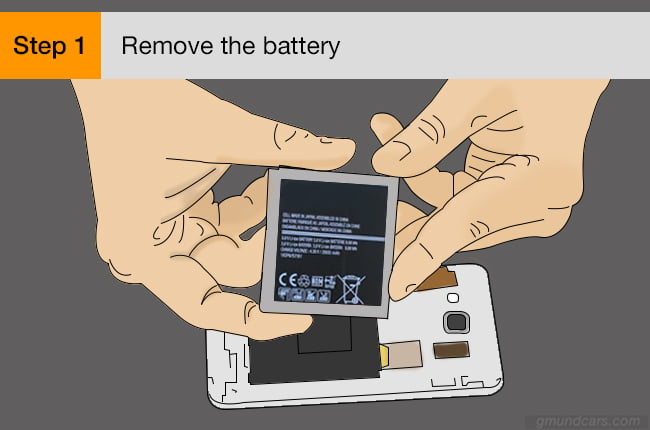
Rubbing the battery
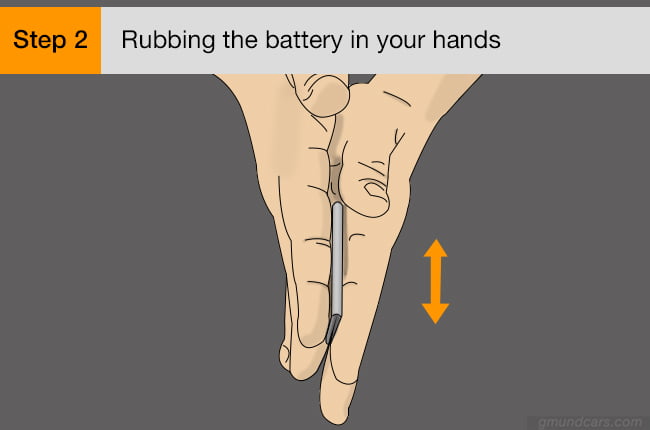
If you’re in a desperate need for your device battery to work, rubbing its battery is actually a legit method to make it work again. By rubbing a battery with your hands, or against a cloth, or by simply clasping it tightly in your hands, it will generate heat that will transfer to the battery’s lithium-ion cells. While rubbing your battery won’t recharge the battery to full, the heating action will activate one or two battery cells to enable their energy flow for a minute or two before it will eventually die.
Here’s a simple 3-step guide of how to revive a small battery by rubbing it:
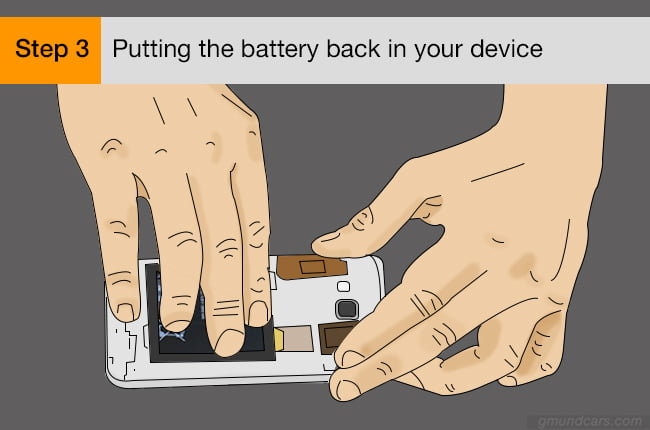
However, you won’t be able to do this with a car battery. It also means that you won’t be able to revive any lithium-ion jump starters this way either. For smaller devices such as smartphones, action cameras, DSLR cameras, and other gadgets, this will work successfully.
The benefit of this technique is that you won’t need to charge the device from any power source. Unfortunately, the downsides to this method are that you may require rubbing the battery for several minutes for any reaction to occur. The charge that it does generate will only last for a moment in comparison to your efforts.
Making a DIY battery charger system
Now, we step into science territory. This method is suitable for most batteries, from those found in vehicles to the little ones you can hold in your hands.
Let me remind you that this project is not for those who don’t like to tinker away in their garages and workshops. And as for you handyman who’s eager to start, it begins now!
A few things you should know first
- You can trickle-charge every single battery that was or will be ever made.
- Trickle-charging uses a low current, which means it is very good for your battery’s lifespan.
- Small bulbs like flashlight bulbs or the ones you hang on your Christmas tree every year will make excellent current regulators.
- Some batteries will have 3 terminals that are labeled “+“, “–“, and “T“. At this point, you probably already knew what “+” and “–” are. So what does the “T” on the other terminal mean? Well, “T” stands for my name “Timmy” of course!
Just kidding! Actually, it’s called a Thermistor – a sort of temperature sensor. Sometimes it is used to regulate charging current, sometimes just for safety. And now with that out of the way, let’s get started on things you will need to prepare.
Things you’ll need
- Your dead battery, obviously
- Wall power outlets
- 12-volt lamp/light bulb with a 5 to 50-watt output
- An adaptor (a laptop’s or any other electronic device’s is good)
- A multimeter. Not a must-have, but strongly recommended to keep track of the current and voltage in the circuit
- A resistor or electrical safety gadget such as a rectifier diode of 3 amps
- Basic electrical knowledge
- Last but definitely not least, courage. And confidence!
5 Ways to connect your DIY charger
It’s charger-free charging time!
Method 1
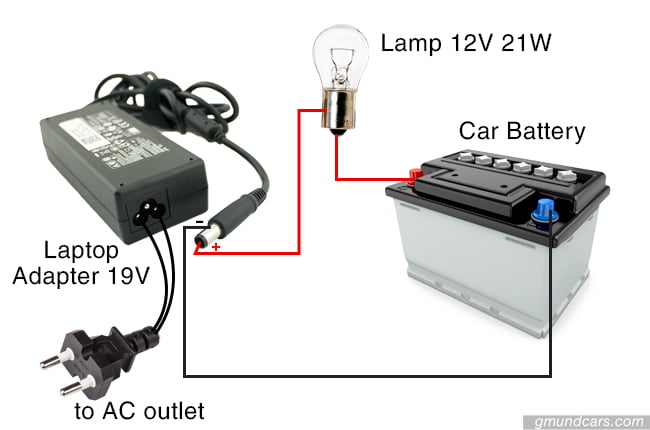
Step 1: Connect the laptop charger adaptor to a light bulb/lamp in series to the positive “+” terminal of the car battery, while the negative terminal “–“ is connected to the laptop charger adaptor’s output to complete the series.
Step 2: The lamp limits the charge of current. To measure this, you can connect the multimeter into series.
Step 3: Make sure you’re not touching any of the elements of this electrical circuit. Turn the mains power source on.
Step 4: The light bulb will burn brightly to show that the electrical current from the mains is feeding into the car battery.
Method 2
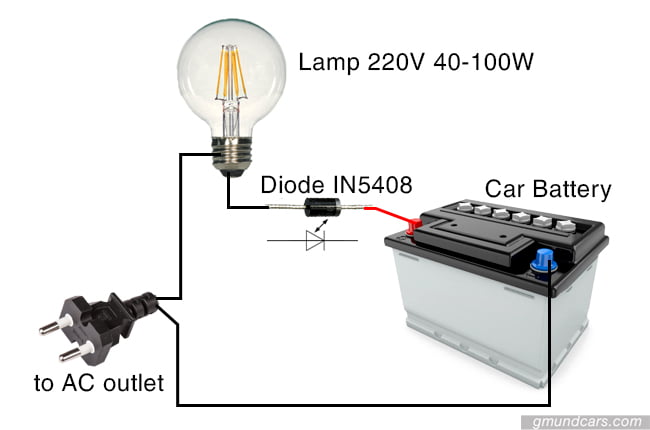
Step 1: Connect a light bulb of 220-volt/60-watts in a series to an AC power network, and a resistance diode (type IN5408) with the car battery.
Step 2: Turn on the power source. The dimmer the light bulb burns, the higher the electrical current in the circuit feeding into the car battery.
Method 3
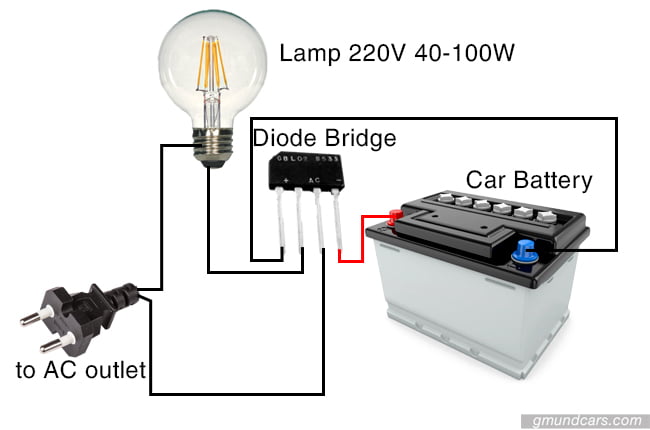
Step 1: In a series, connect a light bulb of 220-volts to the resistance diode bridge and to the car battery from a 220-volt. Then complete the circuit by connecting to an AC current.
Step 2: The resistance diode bridge will allows the electrical current to flow to the car battery in a constant current.
Step 3: Turn on the mains power source to begin charging the vehicle battery.
Method 4
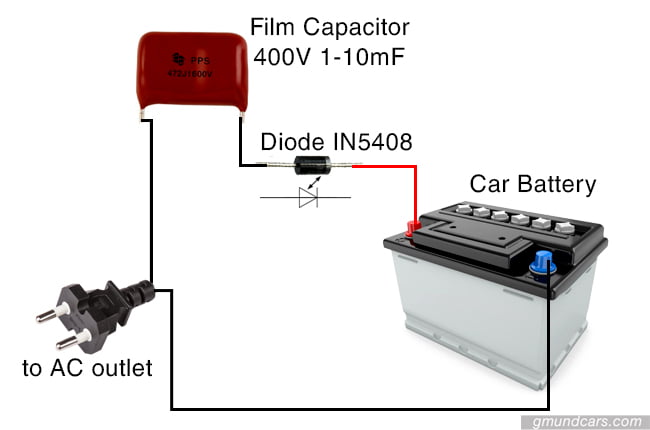
Step 1: You will need to connect a 400-volt film capacitor to the mains power source, a resistance diode (type IN5408), and then the car battery in a series.
Step 2: Turn on the mains power supply once you are safe and prepared.
Method 5
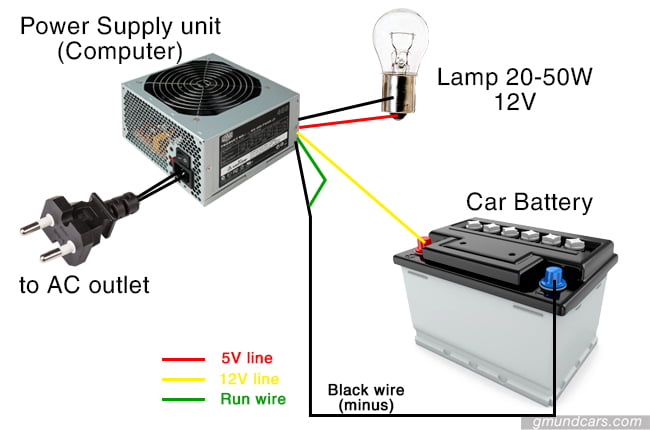
Step 1: From a disused computer power supply unit, connect it to the series as in Method 4.
Step 2: The 12-volt power output isn’t enough to charge a car battery. You need to remove the 12-volt unit wiring (green and black wiring from the connectors). So you can run the circuit without the electrical current passing through the other power stabilization with a jumper connected to the 12-volt power bus.
Step 3: Using a multimeter connected in series, you can measure the current flow. If it is lower than 5-volts, you need to increase the electrical pressure and current.
Step 4: Add a light bulb as a current limiter to increase the electrical flow in the circuit. If one light bulb doesn’t sufficiently increase the current, add more light bulbs to the series to raise the circuit’s electrical current.
Since traditional chargers have sensors that can cut off the power when the battery is full. But iff you charge this way for too long and the battery is overloaded, bad stuff could happen. “Bad stuff” here includes the possibilities of things catching on fire, a tiny explosion, and complaints from your neighbors. Which one’s the worst is up to you.
I’ll say it again: You can safely trickle charge any battery. But it is NOT SAFE to fully charge a battery this way without a comprehensive understanding of that specific battery type.
FAQs
1. Will charging my battery through a USB port with my computer/laptop damage the battery?
No, it won’t damage the battery. The electrical current is constant and stable.
2. Does turning off a device occasionally helps prolong battery’s lifespan?
No, it won’t. Modern lithium-ion batteries lifespans are measured with recharge cycles.
3. Do batteries perform worse when they’re cold?
False. The chemical reactions are not heat-related. If anything, batteries will degrade faster when they get too hot too often.
4. Does leaving a charger plugged in at the wall waste energy?
No, it doesn’t. The circuit is not completed: it only draws power when it is connected to a device that draws current.
5. Should I only charge the battery when they are low or empty?
No, you can charge a battery whenever you need to. The charge cycles of a battery do not affect its lifespan, and are not influenced by the capacity of the battery either.
Final takeaways
Everyone knows that batteries can run out at the most unfortunate times. These methods are here to alleviate some of those inopportune moments. But in truth, you’d have a much easier time visiting the nearest Depot and buy yourself a new charger.
Read more: Best NOCO battery chargers: Review & Comparison »
Read more: Schumacher SC1280 vs SC1281 vs SC1285: Choose the right battery charger »
The whole point of this project is to learn, for all the handymen and future mechanics out there. Just remember to always wear eye protection. And if anything weird happens, don’t breathe in the fumes!
Enjoy cautiously. And good luck!