How frequently have you just hooked up a charger to a car battery, left everything on the “default setting,” and then considered it done for the day?
Well, you are not the first person to do that. In fact, I can’t tell you how many people walk into my car shop with a short charger and a broken battery every day. Only because they didn’t read the amp meter properly.
A battery charger’s amp meter provides vital information for your car battery’s life. And this article will help you understand that information properly. So buckle up, and let’s get started!
What is an amp meter?
First you need to know what is ampere
The best automotive battery chargers feature built-in amp meters. These battery chargers use mains current to recharge vehicles’ batteries. They usually recharge batteries at around 2 amps and need around 24 hours to charge a hatchback car’s battery fully. There are many different chargers on the market, from analog, digital to different brands and designs. They also have different charging rates ranging from 2 amps to 12 amps (sometimes even far higher). The higher the charge rate’s output, the faster the battery will take to recharge. However, fast charging isn’t always the best solution for vehicle batteries. It is because the battery plates can buckle due to fast charging, and in some instances, may even explode.
Now that you have an idea of what amps are, I’ll deep-dive into explaining this technology. Amp (or ampere) is a unit that measures the rate of current in an electrical circuit or conductor. In terms of a vehicle battery, an amp indicates how much electricity can flow through the battery to start and run the car. As I’ve mentioned above, a regular family hatchback’s battery has a 48-amp capacity. While amps are the amount of electricity in a circuit, volts measure the force of that electric current. Voltage is the force of electric current that is pushed through an electrical circuit. The higher the pressure generated by an electrical current’s power source, the higher the number of volts forcing the electrical current through that circuit.
How does amp meter work?
An amp meter can measure electrical current in two ways: By measuring the flow of electrical current, which can be considered as a “draw” of energy in an electrical circuit; and by the amount of energy in a battery, which can be thought of as the “continuity” of an electrical current.
As I’ve established, an amp meter (also called an ammeter) measures amps flowing in an electrical circuit or conductor’s electrical current. Using an amp meter, you can also measure the number of amps in a car battery. They measure this in amp hour (Ah), milliamp (mA), and by milliamp hour (mAh).
Amp hour indicates the capacity of the battery to store energy. For example, I’ve mentioned that a family hatchback has a 48-amp capacity. This means recharging a 48-amp auto battery would take about 5 hours using a 10-amp charger. If you were to recharge that same dead battery with a 2-amp charger, it would take you about 24 hours. To calculate how long to recharge a battery, take the battery’s amp hour rating and divide that number by the charger’s amp output.
Amp meters’ types are based on their designs and different kinds of current flows, and the two primary types are the alternative current (AC) and the direct current (DC) amp meter. Since car batteries only work in DC, not AC, I will only focus on amp meters suited to reading DC.
There are many different designs of amp meters. The most common ones are analog amp meters. Of those, there are a further three classes of analog amp meters.
Moving iron amp meters
These feature an iron needle moved by the flow of electric current through a series of coils and actuators. Moving iron amp meters can read both AC and DC currents, but this type of amp meter is mostly used to read AC circuits.
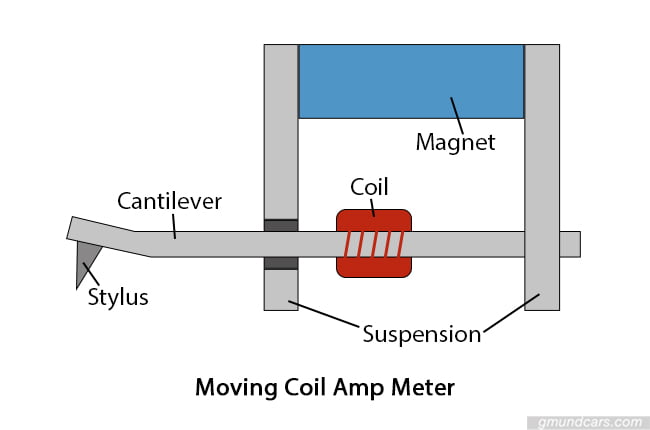
Moving coil amp meters

We commonly find moving coil amp meters in battery chargers. These display the movement that results from the device’s fixed magnets set to oppose the DC. The movement turns an armature that is attached to an indicator dial. The dial displays a scale of amps that you can read to know how much current is moving through an electrical circuit.
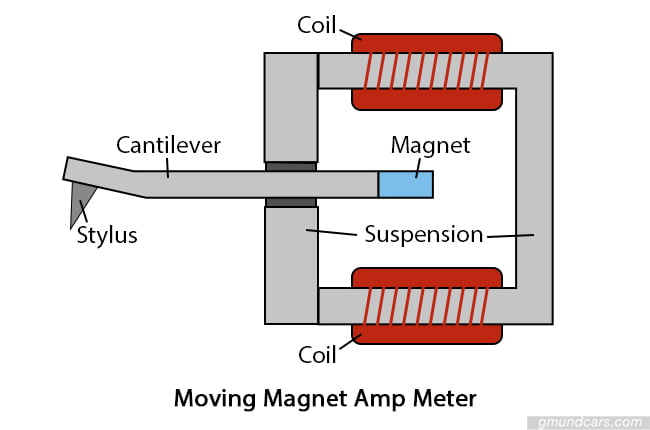
Moving magnet amp meters

Working similarly to moving coil designs, moving magnet amp meters have their electrical coil located within the amp meter’s case. A permanent magnet motion moves the needle. As with the moving coil amp meters, the dial displays a scale of amps. These types of amp meters are more commonly used for measuring stronger currents than in moving coil models.
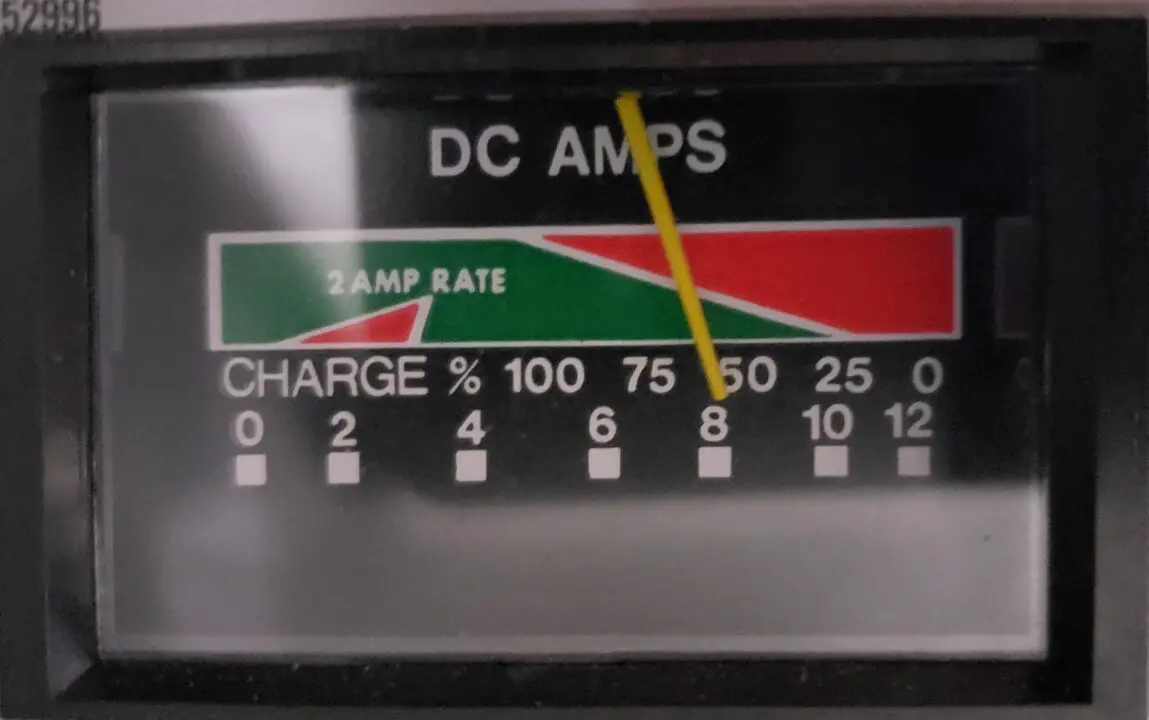
All analog amp meters feature a dial that displays a scale of amps, ranging from 0 to 100. When determining how much electricity is being drawn, the amp meter will range from 2 amps to 50 amps. When measuring the vehicle’s battery, the amp meter will display the number of amps ranging from 0 to 100 percent, in reverse to the amps range. In other words, when the amp meter displays 0 amp, it means that the battery is at 100 percent capacity. That indicates that there is a continued state of charge, with no drawing of its energy.
How to read a battery charger amp meter
Preparation
Safety is of paramount importance when dealing with vehicle batteries. While these battery types are solidly constructed, the chemical reactions within them can still be hazardous. Therefore to ensure your safety, make sure you follow these steps:
- Remove all jewelry, and things like mobile phones, credit cards,… You’ll want that plastic working come Miller time!
- Wear safety goggles and gloves. The hydrogen gas created through the charging process is highly explosive. Sulfuric acid from the battery’s cells eats materials and fabrics to burn skin. A polyester coat or overall is best as sulfuric acid can’t burn through this fabric.
- Be wary of the amps flowing through the electrical circuit that could sometimes be fatal. Remember, the positive terminal (+) must connect with the positive clamp (red) and the negative terminal (-) with the negative clamp (black).
Reading the gauge
Reading the charging rate

- To read the amp meter, first you will need to plug the battery charger into the mains socket and turn the device on. Once it’s on, the needle on the amp meter’s analog readout will jump back and forth on the scale.
- Allow a few moments for the amp meter to settle before you see an accurate amp reading. Most car chargers will have two settings for charging: 2 amps and 10 amps.
- Select the amp output you’d like to charge your car’s battery. For example, when selecting 10 amps, you will see the amp meter’s needle move to 10 amps on the readout.
- As they charge the battery, the needle will drop from the 10 amps position to 0 amp position over time. When it reaches the 0 amp position, it displays that the battery is recharged fully.
Reading the charged percentage
Some battery chargers have two needles in the analog readout.
- As with the single-needle version I explained above, if the needle moves to the number of amps you have set it to, then that needle represents amps’ drawing (how many amps the car is drawing from the battery).
- The other needle then is the one that displays how much energy is remaining in the battery. When recharging the vehicle’s battery, you will know when the battery is charged fully by looking at the needles: if they’re lying on top of each other, the battery is full.

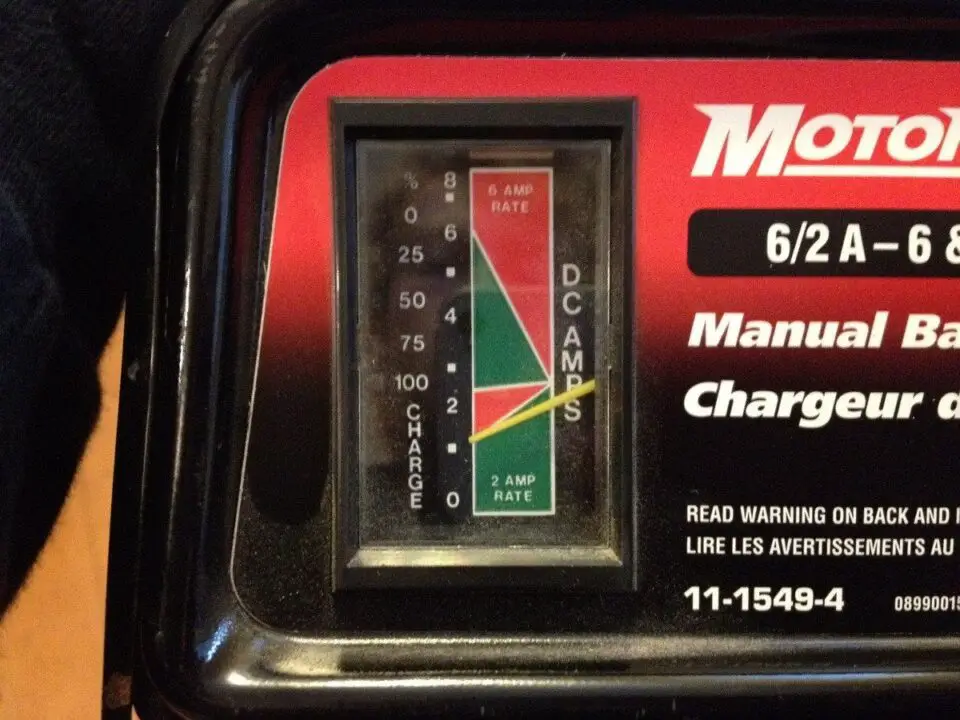
What the heck are these triangle!?
I’ll be honest with you, these symbols are rather pointless. You already have all the information you need with other readings, adding these red and green triangles just makes everyone more confused. But for all my enthusiast readers out there, I will explain them as simply as I could.
- The red triangle refers to the charging rate selected
- The green triangle shows how much energy it requires to fully charge the battery.
For example, if you select to charge your vehicle’s battery at 10-amp charging, the red triangle will show 10 amps flowing from the charger to the battery. As they charge the battery, the needle will move down the scale to 8-amps, 6-amps, and so on. Until the needle reaches 0-amps to display the battery has completed charging.
And when the needle moves from the 10-amps to the 0-amps/100 percent position, it moves through the green triangle. In effect, when the green triangle is at its peak, that’s when the battery is fully charged.
For 2-amp charging, the same occurs as with the 10-amp charging. However, the needle’s movement will be far less visible, and therefore the green and red triangles are smaller compared to 10-amp charging.
How many amps should you adjust?
To calculate how long you need to charge your auto battery and adjust the charge rate, you need to connect and turn on the amp meter for 10-amp charging. Suppose the readout’s needle dances around the 10-amp position and settles there or around 8 or 6 amps. In that case, you know that the battery charger has been correctly connected, and it will also display the current state and capacity of the battery’s remaining energy. If the needle settles on the 6-amp position, it means that the battery has around only 40 percent of its energy remaining.
You can then adjust the amp on your battery charger. For the best charging performance, switch to 2-amp charging as it is safer and doesn’t harm the battery’s durability or lifespan. For example, with the needle on the 6-amp/40-percent position, using 2-amp charging will require about 12 hours for the battery to charge fully.
Think of this as having two buckets of water connected by a hose. One is filled with water, and the other is nearly empty. The goal is to fill the empty bucket with water from the other bucket with the hose. The battery charger is the full bucket and the hose, while your car’s battery is the empty bucket. You can fill the empty bucket with a larger diameter hose, which will fill the bucket quickly. However, there is a significant risk of water spilling or the bucket tipping over from the water “surge”. That’s 10-amp charging. On the other hand, 2-amp charging can be likened to using a smaller diameter hose to slowly trickle the water into the empty bucket in a controlled fashion with no risk of spillage or mess.
How to Charge a car battery with a battery charger
Step 1: Before you turn the battery charger on to recharge your vehicle’s battery, make sure all of the car’s accessories are off and the lights are off.
Step 2: On the battery, remove the negative terminal. This is marked with a negative “-” symbol and is always a black cable. Then remove the positive “+” terminal’s cables (always red in color).
Step 3: On your battery charger, make sure it is off. Don’t plug the battery charger into your mains socket at this stage.
Step 4: Connect the battery charger’s positive “+” clamp to the positive terminal on the battery. Then, connect the negative “-” clamp to the negative terminal on the battery. It is important to strictly follow this process’s order.
Step 5: Plug the battery charger into the mains power supply. Turn on the battery to the lowest charging rate to test if the battery charger is properly and safely connected to the battery.
Step 6: According to the condition and capacity of the battery, adjust the charge rate of the battery charger to either trickle charge it (2-amp setting) or fast-charge at 10-amp or higher setting.
Step 7: Ensure you keep an eye on the charging progress every hour. It is dangerous to leave the battery charger connected to the vehicle battery for longer than is absolutely necessary once it is fully recharged.
Afterthought
Reading a battery charger’s amp meter reveals a great deal of information about the state of your vehicle’s battery. The amp meter will tell you how much energy is remaining (if any) and how long it will take to recharge it. If the amp meter’s needle constantly jumps back and forth after more than a few seconds after connecting, it means that your car’s battery is defective and needs replacing.
I hope this article will help you save time (by speeding up the recharge time) and money (you don’t need to buy a new battery every time your car’s battery dies). Now that you understand just how the battery charger’s amp meter works, you’ll be able to take better care of your vehicle’s battery.
FAQs
1. How do I know if a battery charger is working?
After plugging the battery charger into a mains outlet and turning on the battery charger, you’ll see that the needle on the readout moves around the display scale. After a few moments, it will gently settle on a position. Once it has done this, it displays the charging rate flowing from the battery charger to your car’s battery. This indicates that the battery charger is connected properly to your vehicle’s battery, and the charging is safely taking place.
3. How long does it take to charge a car battery on 2 amps?
It will take about 24 hours to fully charge a car battery. To calculate that, the charging rate of the battery charger is 2-amps per hour and it will take around 24 hours to flow 48 amps into the battery.
4. How long does it take to charge a battery at 10 amps?
To fully recharge a vehicle battery at a 10-amp charging rate will take about 5 hours. This is calculated by dividing the battery’s capacity (48 Ah) by 10 (the charging rate) to reach the estimated charging time of 5 hours.
3. Why does my battery charger needle keep jumping back and forth?
It’s only natural that the needle “bounces” a little bit when you first connect the battery charger. Suppose your amp meter is in a good condition. In that case, there is either a poor connection to the vehicle’s battery or the car’s battery is defective.
- If the battery charger’s clips don’t make a good connection, it will give an inaccurate reading with a jumping needle. Turn off the battery charger and disconnect the clips. Reconnect them and turn on the battery charger again.
- If the problem persists, it might mean that the battery is fully discharged (meaning it is dead) or there is an internal defect/problem within the battery’s cells. In that case, you will need to replace the car’s battery.
Read more: How to recharge a completely dead battery »
