The battery is the most crucial component of your vehicle’s electrical system, followed closely by the alternator.
It is important to have information about this component in case you face some problems and need to have it replaced. This guide will equip you with the information given below.
- The functioning of an alternator
- Symptoms and causes of a worn-out alternator
- Alternator replacement cost
Ready? Then let’s get into it!
Automotive alternator: the overview
What does an alternator do?
An alternator is a generator designed to supply electricity to the car and recharge the battery. It produces alternating current (AC) supply and converts mechanical energy into electrical energy.
That is why alternators are also known as AC generators or synchronous generators.
Standard vehicles will have an alternator included in the internal combustion engine. The alternator has a compact size, mounted on the front of the engine with a belt running around it.
Otherwise, there are several different types of alternators based on application and design. You can get this in case you own a hybrid vehicle model.
What are alternator parts?
Despite being as big as a coconut, the alternator can fit in many parts in itself. Here is a list of the main common parts found in an alternator. Each of these plays a crucial role in providing the optimal amount of power to the vehicle.
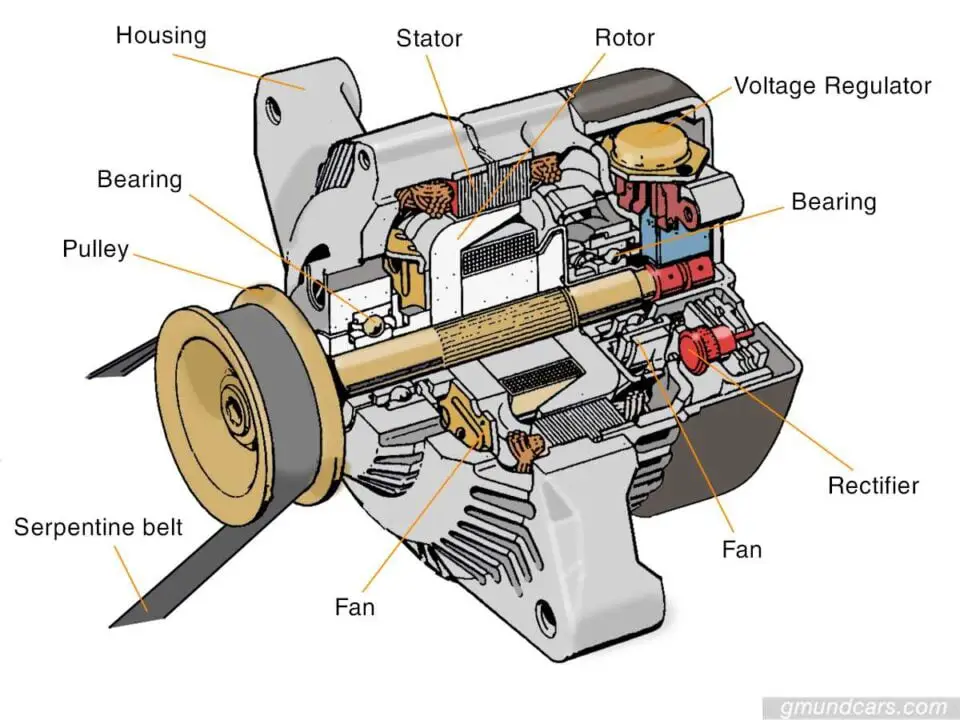
Pulley
The alternator pulley provides the means of transferring power. It acts as a connector between the rotor assembly and the engine, with the help of a drive belt.
A pulley ensures that the rotor assembly is rotating properly while the engine is running. The mechanical link it provides drives the alternator to recharge the car battery.
You will come across three types of alternator pulleys.
- Solid Pulley – These pulley types are utilized for transferring power from one shaft to another.
- One-Way Clutch Pulley (OWC) – The one-way clutch inside this pulley brings the alternator rotor to a stop when the engine is shut down.
- Overrunning Alternator Decoupler Pulley (OAD) – Apart from having a one-way clutch, OAD ensures higher functioning level with reduced noise and harshness.
Serpentine belt
The serpentine belt is also known as the alternator belt, fan belt, or drive belt. It runs from the pulley on the alternator to the crankshaft.
As said before, this alternator belt helps the pulley to keep the alternator spinning. Without this spinning, the battery will not be charged and die after only a short amount of driving.
Bearing
Efficient spinning is important for the alternator to work properly. You achieve this with the alternator bearing.
Alternator bearings are attached on the front and at the end of the rotor shaft. They provide the support that the rotor shaft needs to rotate freely without any irregularities.
When dissecting the alternator’s components, you will see a front and rear bearing on the alternator’s housing. These two bearings help bring the front and rear alternator housing come together.
Rotor
The rotor is the main component of an alternator that keeps the motors running. It is located on the stator shaft and therefore rotates inside the stator itself.
As the rotor is spinning, the collection magnets surrounding it are also spinning rapidly. This creates a magnetic field that cuts the stator coil. With this, the stator coil can generate an alternating current or AC.
You should remember that a faster rotor rotation means more electric current from the stator coil.
For the rotor assembly function, there are several components included:
- Rotor shaft – The shaft that rotates the rotor.
- North rotor claw – Claws become north pole electromagnetic when the electricity flows through the rotor coil.
- South rotor claw – Claws become south pole electromagnetic when the electricity flows through the rotor coil.
- Rotor coil – Coiled between the rotor shaft and the rotor claws.
- Slip rings – They are connected to the rotor coil and make the electric current flow as the rotor spins.
All these components come together to allow the alternator to generate power.
Stator
As you know by now, the stator and rotor work together to generate electric current. However, unlike the rotor, the stator remains stationary in its place. It includes bundles of conductive copper wiring called windings.
This stationary set of windings is what surrounds the rotor. The electromagnetic force created by the rotor rotating inside the stator coil is how the current gets made. Without the presence of a stator, the alternator will have no way of transferring charge or power.
Stator coil can have two types of connections – Y connection and delta connection. A stator with a Y connection works well when you need current output at low engine speed. On the other hand, a delta-type stator is used with high output alternators.
Rectifier
The rectifier does its job during the charging process. When the alternating current (AC) enters the rectifier through the stator, the rectifier converts it to direct current (DC).
So for the energy conversion to take place successfully, alternators include rectifiers with 6 or more diodes. Diodes make sure that the current is passing through only one direction and blocks the other.
Voltage regulator
As the name suggests, a voltage regulator regulates how much power is distributed from the alternator to the car battery. It acts as a monitor, overseeing the voltage output level given to the battery.
That way, it also decides how much power has to be delivered to the rest of the vehicle’s electric systems.
When the voltage level reaches a threshold of above 14.5 volts, the regulator decreases the current in the rotor. If the output voltage is below 14.5 volts, it will increase the current in the rotor instead.
An alternator may have either an internal voltage regulator or an external regulator. Modern car models tend to have internal regulators that control the charging output efficiently. Older car models, however, will have external regulators.
Housing
Housing is the protective gear that secures the inside components of the alternator like rotor, stator, rectifier, and etc. The way housing covers them makes it almost look like a house for the parts, hence the name.
To cover the alternator from both ends, housings are split into two parts – front housing and rear housing. The front housing is placed after the pulley, while the rear housing is attached with the stator body.
Fan
Any electrical system inside the car is bound to give off the heat after long periods of use. For that reason, alternators have cooling fans. They will cool down the system, allowing it to operate more efficiently.
These fans are built with vents and aluminum casing for better circulation of air. You can either have an internal or external cooling fan, depending on what alternator model you have.
A new alternator will have internal fans. Internal fans are attached to the rotor for better cooling. Older alternators have external fan blades attached to the rotor shaft next to the front housing.
How does an alternator work?
Now that you know the parts of an alternator, you may wonder – how do all of them work together? How can an alternator produce electricity and recharge the battery? So, let’s read on to find the answers to those questions.
How does the alternator produce electricity?
Let’s take a look at how the alternator produces electricity.
In modern cars, alternators are driven by the engine crankshaft itself via the alternator belt. However, older cars require a separate pulley, running from the crankshaft to the alternator.
The mechanical energy comes from the movement of the alternator belt that spins the rotor inside the stator shaft. Electricity is produced through electromagnetism, formed by the spinning rotor.
The north and south claw poles fixed around the rotor are staggered, making the claws alternate while they surround the rotor windings. The alternating pattern between the poles creates a magnetic field.
Permanent magnets surrounding the rotor are placed in a way that they can pass over the copper winding of the stator. The interaction between the magnets and the winding helps with producing the electromagnetic force. This magnetism, in turn, produces voltage that the stator captures.
A stator can “capture” the voltage since it harnesses the power from the spinning rotor. Once the voltage reaches the voltage regulator, the regulator disperses it to the battery and other electric systems.
How does the alternator charge the battery?
The electrical energy coming from the stator must be first converted to a form that the battery can use. That is where the rectifier comes in.
Car batteries use one-way direct current electricity instead of alternating current. Alternators, however, produce alternate current electricity.
So before entering the voltage regulator, the battery’s power will go through the rectifier bridge. After this conversion, direct current electricity will head for the battery that uses it for recharge.
How long does an alternator last?
Some car manufacturers claim that the alternator will last as long as the vehicle itself. However, it is very rare for an alternator to do that.
Even quality alternators can only last 5 to 8 years. This lifespan is also affected by factors like how often you drive your car and how old the model is. The more you use the electrical systems in your car, like powered mirrors, the shorter the alternator’s lifespan is.
In terms of miles, your alternator’s average lifespan will fall anywhere between 40,000 to 150,000 miles.
Newer and advanced car models are on the higher end of this range. On the other hand, older or economical cars stay on the lower end.
To regularly check the health of your alternator, just use a multimeter. It measures the electrical alternator output. You start the car without switching on any accessories. After that, all you got to do is connect the multimeter to the battery terminals.
For an accurate reading, make sure you select the DC scale for alternator power measurement. The device will then show you the DC readings.
Causes and symptoms of a bad alternator
As it goes with every electrical component, there comes a time when the alternator reaches a point of deterioration.
There are several telltale signs that will inform you of the alternator’s failure to work. Here are some of the common symptoms to look out for.
| Symptoms | Causes/problems | Solutions |
|---|---|---|
| + Dim or flickering headlights + Power seats, car audio and other electrical problems Read more | + A dying or dead alternator resulting a weak battery | + Test your alternator + Replace it if it's bad |
| + Stalling or difficult starting Read more | + Wiring problems + Blown-out fuses + Computer problems + Not enough power for sparks plugs + Broken pulley or broken belt + Bad battery | + First, jumpstart your car + Then, test your alternator + If the alternator is bad, it needs replacing |
| + Bad smells Read more | + A drive belt is heated up due to excess tension and friction + A drive belt is slipping on the alternator pulley and needs to be tightened. | + Check your drive belt + If it is still good, align and tighten it correctly + If it is bad, replace the drive belt |
| + Strange noises Read more | + Worn-out or broken bearings + The drive belt is misaligned or rubs again the side of the pulley. | + Replace the bearings in your alternator + Check and align the drive belt in the right order |
| + Dashboard light appears with “ALT” or battery icon Read more | + A dying alternator | + Alternator needs repair or replacement |
Dim headlights and other electrical problems
Dim or flickering headlights are one of the most common symptoms of a dying alternator. This symptom means that the alternator is closing in on a time of death. A dying alternator will have trouble charging the battery while the engine is running.
An alternator is what powers your headlights. So headlights rapidly alternating between dim and bright means the alternator is giving inconsistent voltage.
When the alternator is going bad, it can affect how other electrical systems work in the car. These include power windows, dashboard lights, power locks, air conditioning, wipers, and even your stereo!
They will begin to work slowly if not enough power is coming from the alternator. If the alternator is dead already, then these systems will stop working completely.
Stalling or difficult starting
Another sign of your alternator failing then is when the car stalls while running or refuses to start.
The car battery running on electricity means the car requires both fuel and electric energy to start. Your alternator provides power to the spark plug that ignites the fuel in the engine.
An alternator not working means there is not enough power for the spark plug to start the engine. As a result, your car will stall at random moments or have trouble starting. Every time you turn the key in the ignition, the engine will produce a clicking sound.
The alternator may face a problem in delivering the power to the engine due to some wiring problems. If the wires are damaged or old, the charge will not transfer through the alternator.
Blown-out fuses might also play a role in stopping the alternator from working. Whether it blows out due to a power surge or of old age, either way, you must replace it immediately.
If you drive a new car model, also check the computer system. These computer systems are a smart way of controlling all vehicle components, including the alternator. In case the system experiences a glitch, it means the alternator is not working.
As you know, the alternator generates electrical energy from the mechanical energy produced by the alternator belt and pulley. A broken belt or pulley will stop the alternator from producing electricity altogether. So the alternator stops working, and no power will be available for the spark plugs.
Sometimes the complication can also arise due to a bad battery. A bad alternator can cause the battery to become drained, eventually not charging at all. You will find yourself frequently jumpstarting your car due to this.
Bad smells
There are two types of smells in particular that indicate a bad alternator. This smell is typically a result of some issues regarding the alternator belt.
A burning rubber smell is produced when the alternator belt is unable to move the intended way. So the belt starts to generate excess friction and tension while running. Since it’s so close to the engine, this worn-out belt will heat up causing the burning rubber smell.
The alternator may also experience problems if the belt on the pulley is not tightened. The belt starts slipping, which induces an electrical burning smell. This results in the alternator not being able to produce enough output.
Strange noises
It is quite common for a failing alternator to produce unusual noises. When the alternator bearings start to wear out, it means the alternator is no longer working efficiently. So, the alternator begins to make sounds like rattling, whining, and grinding due to the worn-out components hitting each other.
The noises can also come from the irregular movements of the alternator belt. If the alternator belt rubs too much against the pulley, you may notice some strange sounds coming.
Battery warning light on dash
If you have a modern card model, you will see an indicator light in your dashboard panel. This warning light is red and shows up on the panel looking like a battery. Some older cars with warning lights will display this as GEN for generator and ALT for alternator instead.
The triggering of this warning light is perhaps one of the first signs that will tell you about your failing alternator. Even if you are not experiencing any other symptoms, you should still pay attention to this warning light.
It lights when the alternator output falls below a certain level, anywhere between 13 to 14.5 volts. Most alternators maintain an output level of 13-14.5 volts. If the level falls below this range, the warning light will appear. At that moment, not enough voltage is reaching the battery, causing the car engine to stall.
In case this light switches on while driving, it means your alternator is malfunctioning. You must immediately shut off any unnecessary electrical appliances in the car.
How to test and replace an alternator
How to test an alternator
If you discover your alternator experiencing symptoms like the ones mentioned above, it is time to test the alternator.
It might seem a little challenging to tell if your car alternator is working properly. Make sure you are always on the lookout for unusual sounds to tell if your alternator is bad quickly. You need to know where to look and how to figure out if there is a problem with your alternator if you want to fix it.
Generally, there are two ways to figure out whether your alternator is in good shape or not. Continue reading to find out how you can test an alternator in your car easily.
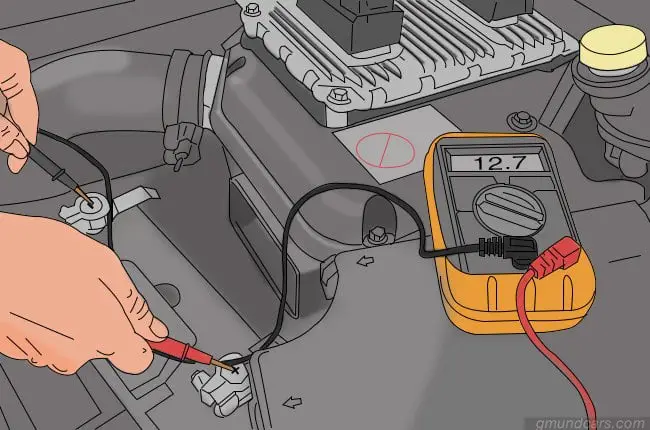
With a multimeter
One of the best ways to assess the state of your alternator is by using a multimeter. This device can help you check the status and working condition of the alternator. However, if you have a voltmeter handy instead of a multimeter, you can use that instead.
Here is how you can use a multimeter to test your car alternator.
Step 1: Get yourself a voltmeter or a multimeter
The first step to checking your alternator is getting yourself the right equipment. If you don’t already have a multimeter or a voltmeter, you must go ahead and buy yourself one. It is effortless to find one at your nearest auto parts shop.
This gadget is affordable, and you will find several uses for it in the future. Either a multimeter or a voltmeter will do the trick. The key difference between the two is that a multimeter is used to measure the voltage and current, resistance, etc. However, a voltmeter only checks the voltage, which is essential to test an alternator.
Step 2: Test your battery
Once you get the required tools, you should start with the basics first. Get right into checking your car battery before anything else. The battery powers the car, and it must function adequately first for the alternator to work.
You will not be able to test your alternator if the battery of your vehicle is not recharged. So, before you conduct any test on your alternator, you need to check the battery first.
The best way to check if your battery is in good condition is by opening the hood and connecting your multimeter or voltmeter to the battery. Connect the red lead to the positive (+) terminal in the battery, the black lead to the negative (-) terminal, and then take the reading. Make sure that the car is not on when you do this.
If the reading on your device is around 12.6 volts to 12.8 volts, your battery is good to go. In case it is not high enough, you will need to recharge your battery. Recharge it or replace it depending on the condition.
Step 3: Start the engine
After checking the battery, your next step is to turn on the car engine with a key through the ignition. Turn up the power in your car and rev the engine. You need to take your engine to about 2,000 RPM (revolutions per minute) at least. This is done so that a lot of power is put on your car battery.
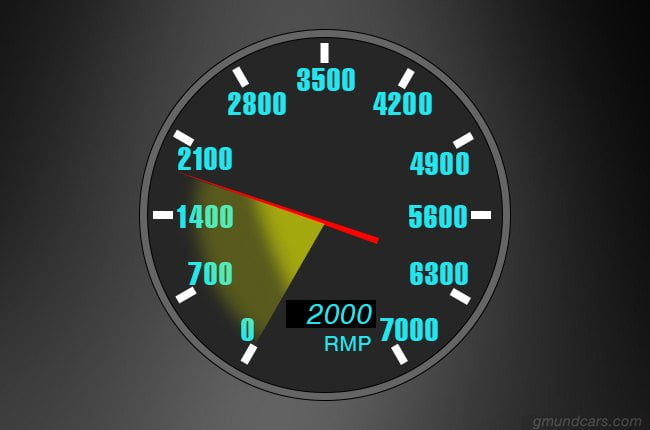
When your battery is stimulated this way, it, in turn, sets the alternator in motion. The voltage regulator in your car is responsible for this as it takes your alternator to high gears.
Step 4: Test the battery again
After this, you must keep the engine turned on and go ahead and test your battery again. Your alternator is doing well if the reading is 13.5 volts at least.
You can switch up the RPM and then recheck your readings. If your readings are anywhere from 13.5 to 14.5, you do not need to worry about your alternator. There needs to be a level of fluctuation in the reading. If your reading is the same or dips below 13 volts, your alternator is wrong.

Additionally, conduct the same test with the lights, A/C, and radio on in your car. Readings above 14 volts are considered normal. If it is below 14, you may need to replace your car alternator.
Without a multimeter
Here is how you can monitor your alternator and make sure it is working well if the multimeter method does not work for you.
Keep your ears sharp
This is something you need to do when your car engine is still running. Keep your ears close and try to listen to the sound of your alternator. It is very easy to hear any issues in the bearings of the machine.
You can hear the alternator making squealing sounds that imply it is not in the best shape. This sound can gradually increase with time or when you put a lot of pressure on the alternator like switching on lights, A/C, heater, etc.
Check the radio
If you have noticed that the radio sound quality decreases every time you rev the engine, chances are your alternator is to blame. You can test this out by merely tuning your radio to a low number on the AM band. You do not need to play music right now. After this, you can rev your car engine, and if the radio whines, your alternator is not working correctly.
Ask an auto-parts store
If you think you cannot carry out these tests on your own, you should just approach a professional. Most auto-parts stores want you to buy alternators from them. So, they offer testing services for free. They will test your alternator, and in case something is wrong with it, these stores will readily replace it for you.
How to replace an alternator
After conducting various tests, if you feel like your alternator is not in the best condition, you might need to replace it. Replacement is easy, and you will not need any external help if you know what to do and how to go about it.
Here is what you need to do if you want to replace your car alternator.
Preparation
Before you remove the old alternator from the engine, here is what you need to do.
Step 1: Prepare tools needed to remove an alternator
- Safety gear
- Ratchets
- Jack, jack stands, and wheel chocks
- Belt tensioner tool
- Wrenches
- Sockets
- Battery tender or memory saver
Step 2: Position your car correctly
The first thing you need to do is position your car correctly. You can park your vehicle at any leveled surface and make sure it is not inclined in any direction. This is because once you jack up the car, you do not want it to topple over. It will also make your work easier. Once it is parked, make sure you pull the brakes, so it does not move.
Step 3: Jack up the vehicle
Although you do not need to jack the vehicle up, you can do it if you think it helps. It will make locating the alternator easier and give you more space to work.
Step-by-step guide
Removing old alternator
First thing first, you will need to remove the old alternator from your car. Here is how you do it!
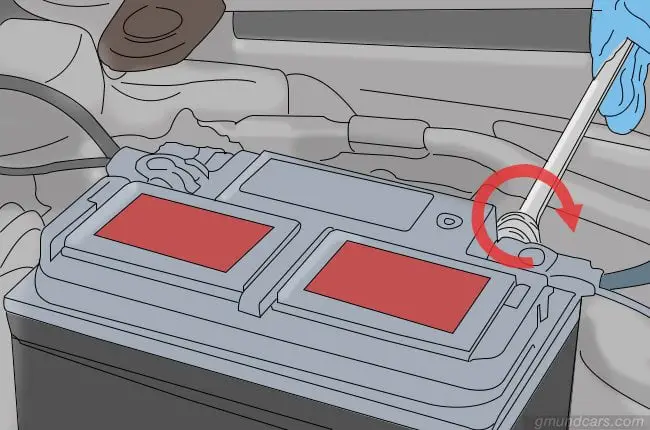
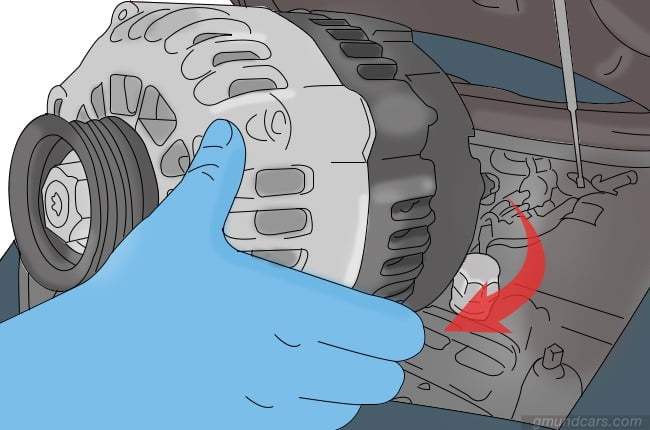
Step 1: Disconnect battery
Find the negative terminal on the battery and make sure the bolt on the socket is loose before you slide it off. Once you slide the cable off, your battery will be disconnected. You do not need to remove the positive line. It would be best if you did this before working on the alternator because when it is connected to a power source, there is a high chance of you getting electrocuted.
Step 2: Remove power source from the alternator
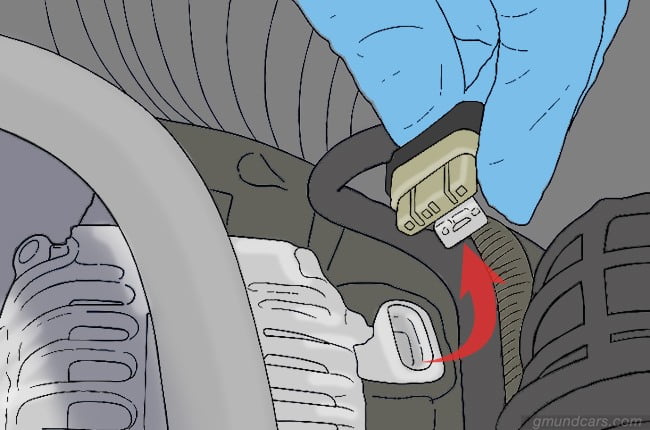
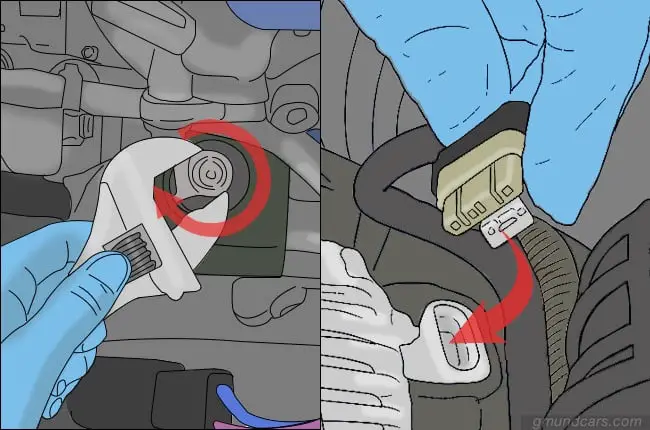
You will need to remove the power cable from the alternator before you begin working. It is connected to the battery, and you will need a ratchet to remove it if there is not enough space. Once you seep your way in, make sure the bolt is unscrewed and pull the cable right off.
Step 3: Remove safety clips
You will need to remove the connecting wires from the alternator too. The only way to do that is to remove the safety clips from the device. Release them with the help of your finger or a screwdriver and slide them off. Be careful not to damage the plastic clips while you do this.
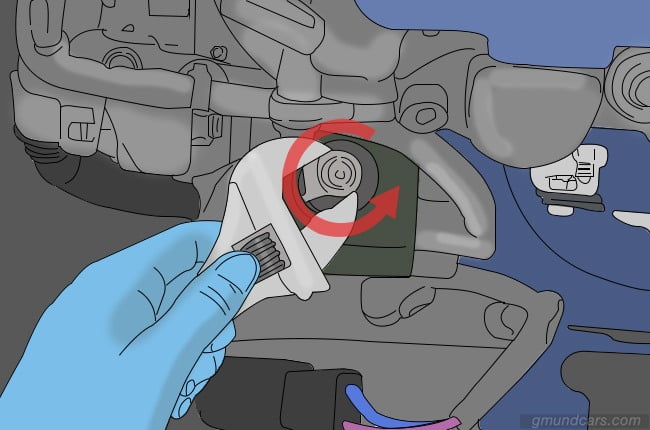
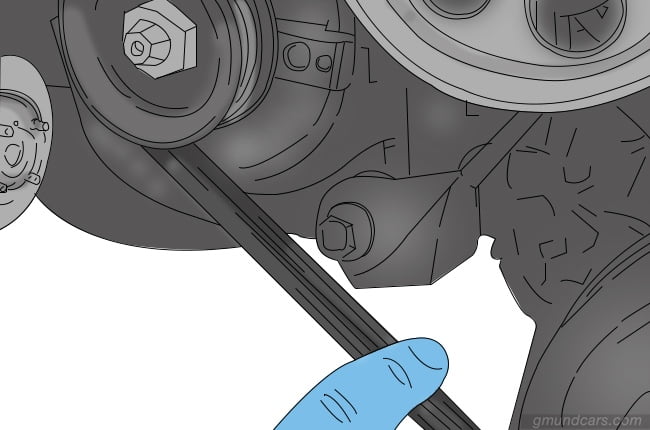
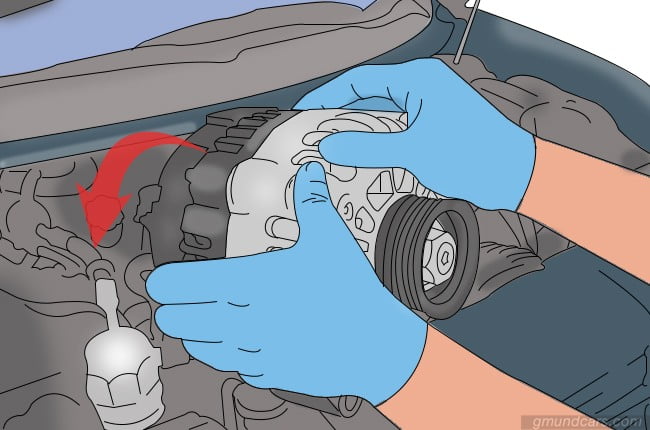
Step 4: Remove the bolts
The alternator is connected to the car with the help of two bolts. To remove it, you will need to loosen the bolts. However, if the serpentine is not in excellent condition, you might have to remove the bolts completely.
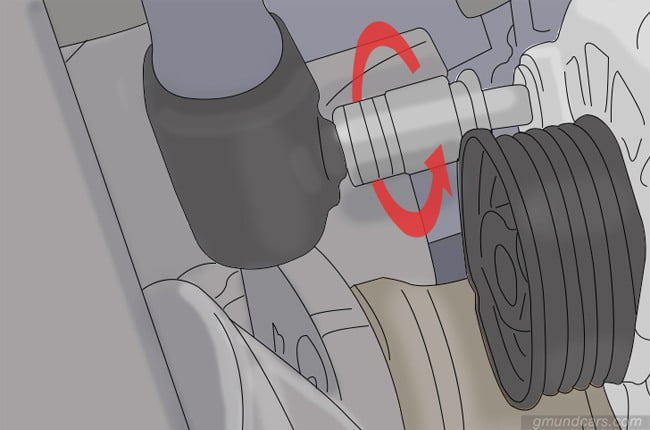
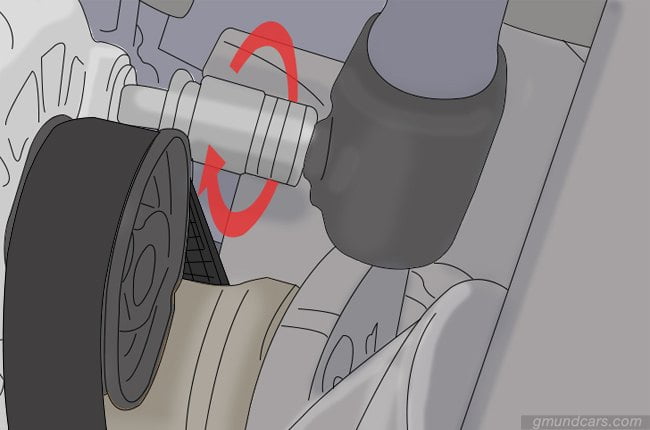
Step 5: Check and remove the serpentine belt
Make sure the serpentine belt is not broken or damaged. If it is, you will need to replace it with a new one.
Step 6: Remove alternator
After this, you can gently pick up the old alternator from the engine bay and remove it.
Installing new alternator
Mentioned below are the steps you need to follow if you want to replace your old alternator. This will be done once you prepare the car and remove your old alternator; only then can you install a new alternator.
Step 1: Place the new alternator in the engine bay
After removing the old alternator, you might need to tap out the spacers about 1/8th inch. This will make installation easy after you pry out the old alternator. Place the new alternator in the engine bay and see if it is compatible. If you are looking for a new alternator, make sure to read the top alternators’ reviews below to find the best one for the replacement. The review below has some of the best-suited alternators, continue reading to find one you might like!
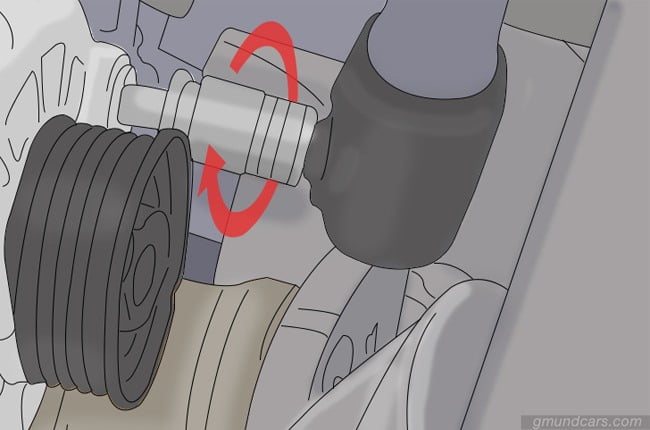
Step 2: Insert the bolts
If the alternator is compatible with the vehicle, you can insert the mounting bolts. If your car is not equipped with an auto-tensioner, make sure the bolts are not completely tightened and left loose.
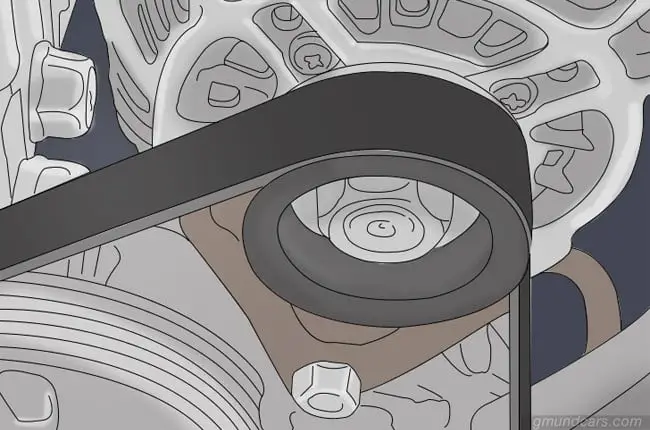
Step 3: Place belt
You can place the belt on the alternator pulley. Tighten it with the help of a screwdriver and secure it to the alternator. Be careful not to damage any other component in the car as you do this.
Step 4: Tighten the belts and bolts
If you have left your mounting bolts loose, you can now tighten them. Do this only after you assess the belt and see that it is tightly placed around the alternator.
Step 5: Reassemble the wiring
Once you place the alternator in the engine and secure it, you can reconnect the wiring and battery. Follow the same steps you did when you disconnected the wires and battery backward, and you will be good to go!
How much does it cost to replace an alternator?
It is risky trying to force your car to run on a faulty alternator. The car can come very close to shutting down completely. So, make sure to swap the bad alternator out with a new one.
Alternator pricing varies depending on the brand and the size you decide to go with. You can either go with a rebuilt alternator or an aftermarket alternator.
At $60-$80, rebuilt ones are the cheapest available. Although cheap, they run the risk of getting worn out as soon as you buy. Best that you go ahead with purchasing a brand new aftermarket alternator.
A good quality alternator can go for anything between $130-$350. If you buy a high-end branded alternator, the price can go as high as $1000.
The rest of your alternator replacement bill depends on whether you get this done yourself or from a shop.
DIY
There are some obvious benefits to doing it yourself, one of them being the money you save up. To replace an alternator, you need minimal mechanical experience and common tools that most households keep. Therefore, the total cost will be $200-$350, including the aftermarket alternator and any tools you need to buy.
The only thing that might concern you is the time investment. If you are new to this, it can take you around 4 hours to replace the alternator.
Go to the shop
Mechanics take around 2-3 hours to replace the alternator. That means labor costs will amount to $100-$200 based on the rate of $50/per hour. This rate can vary depending on the kinds of quotes mechanic shops give in your area.
The hours can increase if the mechanics need to take out other parts in the engine to reach the alternator. As the hours go up, so does the rate.
If an alternator belt has to be added separately, add $20 to $50 more to your final bill.
Buying and fitting a new alternator from a dealership will further increase the billing price. Dealership alternator along with labor costs can cause the bill to go up as high as $800. Because the high replacement cost is high, I recommend you to have it done by yourself. The step-by-step guide on how to replace your alternator is not a big challenge, so don’t worry if you don’t have much mechanical experience.
Final thoughts
Car alternators essentially run every electrical aspect of your car. Making sure it is always in the right condition. You can look after your car alternator by always being alert.
Be on the lookout for unusual noises and improper functioning of your car’s electrical features. You can also conduct regular checks with the help of a multimeter. This way, you are always on top of things, and you will instantly know when to replace a worn-out alternator.
Moreover, when you need to replace your old one, don’t forget to do ample research on the best alternators before settling for a new alternator!