How to install a car amplifier [with infographics]
gmund-20&tag=gmund-20&creative=9325&linkCode=as2&creativeASIN=B07YRRST2G&linkId=ed62b78fea357fae42d95c2bec0e4718″ rel=”nofollow noopener”>Check Price at Amazon
You will need to connect your amplifier to your car’s engine so that it can draw power to play. This is why you need a power supplying cable that is thick enough to handle the amp’s output.

InstallGear 8 Gauge Black
The earth wire prevents you from getting electrocuted once electricity flows from the engine to the amp through power wires. Ensure that you know all about the different types of cables and which wire thickness works best for car amplifiers.
An in-line fuse prevents a fire from breaking out. Therefore, this will protect the car in case there is a short circuit.
These wires get input signals from stereo receiver output. It would be best to find the right length of wires to make sure your amp is connected correctly. It is advised that you choose wire sizes between 18 to 14 gauge for amplifiers.
You will be able to control the amp with these buttons. Make sure they are connected to the system with appropriate wires.
Your safety is of the utmost importance. So, before installing your new amplifier, you need to make sure you are taking the necessary precautions.
Disconnect the power
One of the most important things to keep in mind is disconnecting the battery source’s negative terminal. Please remove it from your car battery before you start wiring again.
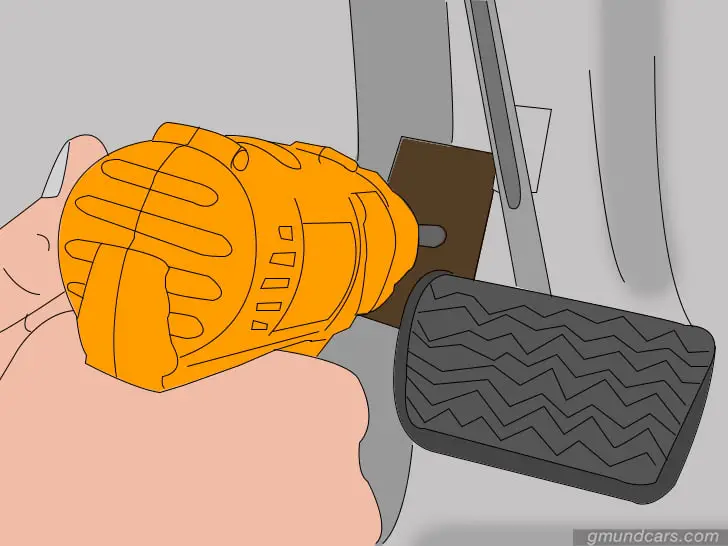
Keep the fuse handy
Make sure you attach the power wire fuse and use it while working on your car. This fuse prevents any fire from breaking out in case there is a short circuit.
Choosing the right amplifier for your car is also very crucial. There are many different types of amplifiers available in the market. But the choice of the amplifier depends on the kind of car you own.
On top of this, there are various brands with similar products, and you need to know the differences between these amplifiers. This part will help you make the right choice for your car.
If you enjoy listening to music while driving your car, you know the importance of having powerful speakers. Without amplifiers, you will never experience that superior quality of sound when you are in your vehicle.
Amplifiers are essential because they boost low-level audio. The amplifier powers the head unit to allow the low-level audio signal to reach its full range. This signal is amplified to move the cones of the speakers, thereby creating high-quality sound.
The best way to pick an amplifier for your car is to figure out what kind of speakers you want. Once you buy the speakers, choosing an amplifier will become significantly more simple. You will need an amp that can handle the power of these speakers.
You can do this by first figuring out the RMS value of your unit. After that, you can look for an amplifier that gives you an RMS figure of anywhere between 75% to 150% at the very least. This way, you will have excellent audio quality in your car, and neither your amp nor speaker will suffer.
With innumerable options available online, choosing the right amplifier for your car can be tricky. You are almost spoilt for choice when picking an amplifier in the market. This wide variety of options makes it all the more crucial for you to make an informed decision.
Here is a list detailing the different types of amplifiers, to help you decide on the right one.
| Amplifier | Pros | Cons |
|---|---|---|
| Multi-channel amplifier | Can be used for a bigger set of speakers | Quite expensive |
| Mono channel amplifiers | Affordable | Not very powerful |
| Class A | Great sound output Can be used with a set of speakers | High power consumption can drain the car battery |
| Class B | Power-efficient Do not heat up easily | Audio is distorted |
| Class A/B | Power-efficient Great audio output | Heat generation |
| Class D | Power-efficient No heating Small size | Audio distortion with high frequencies |
Multi-channel amplifiers are an excellent option for those who want to have many speakers and subwoofers in their car music system. These amplifiers are available from 2 to 6 channel varieties, with the most common being the four-channel amplifier.

Crunch PX1000.4 Power Amplifier
You can use the four-channel amplifier to connect door speakers to a small subwoofer in your car easily. However, if you want a better bass and more speakers, it is advised you get yourself the six-channel variant.
A mono channel amplifier is one of the simplest types of amplifiers. It is used to support either a few small speakers in a set or a single small subwoofer. If you are looking for an affordable amplifier, then you can opt for this variety.

BOSS Audio Systems R1100M
However, the sound output in these amplifiers is not as powerful if you power multiple speakers and subwoofers.
These amplifiers are great when you want a brilliant sound output from your music system. They are large when compared to other amplifiers.
The catch here is that Class A amplifiers are not power efficient. This particular type consumes a lot of energy because of runs on optimum power at all times. That is the reason why these amplifiers tend to overheat.
Class B amplifiers are a better alternative in case you do not want to drain your car battery for the sake of good music!
These amplifiers use half of the power in their output as compared to Class A amplifiers. This is because they switch the outputs and make their function more efficiently. The only catch here is that these amplifiers do not have excellent audio quality.
This type of amplifier has the best qualities of both Class A and Class B amplifiers. It has excellent audio output, but it does not consume as much energy as Class A. The only problem with these amplifiers is that they can heat up rapidly.

BOSS Audio Systems R1100MK
This type of amplifier is also known as a switching amplifier. It works in continuous on and off signals, making them a lot more efficient than the other varieties. Class D amplifiers are generally smaller in size and have little audio distortion when high-frequency audio is played.

Rockford Fosgate R500X1D
Installing a car amplifier does not require any core technical expertise. But it can still be challenging for an amateur.
With the right set of instructions detailing the amplifier’s specifics, you can tackle such a task easily. Moreover, you also get to learn a thing or two about car stereo systems! Keep reading to get step-by-step instructions on how to install a car audio amplifier.
You should mount your amplifier on a safe spot from where it cannot come off loose. So, the area should be flat. The amplifier should not be too close to the stereo to avoid crackling sounds or noise spread. It is usually placed behind or underneath the rear seats, or you can fit it in the back of your vehicle near the luggage storage section.
When choosing the right spot, you should consider the size of your car. An amplifier needs ample space for good airflow circulation in case it gets too hot. There should also be enough room for wiring and adjusting the controls when needed.
So, the best places to install an amplifier include under the rear seat, the trunk area, or the passenger side foot-well. This guide will be applied for any of those locations. Once you have chosen the location, do not forget to mark the location with a sharpie. This way, you remember where to drill the screws in!
Now, if you are ready to take on the laborious work of mounting the amplifier, let’s take a look at the further steps.
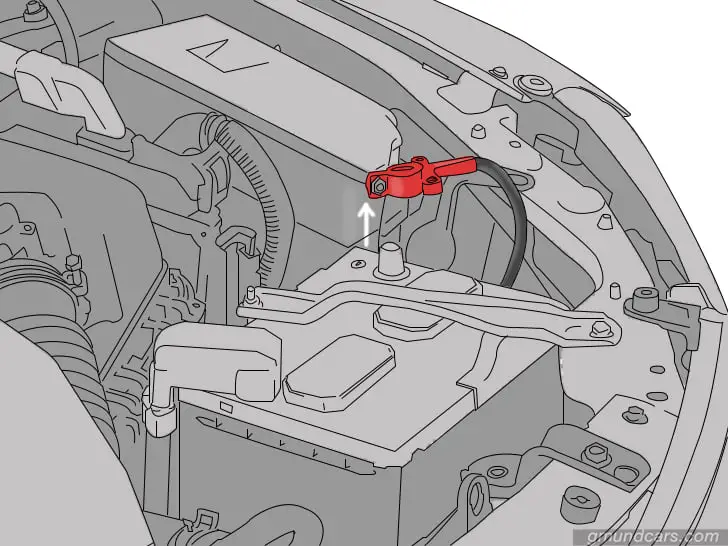
If the battery is still attached while working on the car stereo, you might get an electric shock. So, pop the hood and locate the battery to disconnect it.
You can use a socket wrench to loosen the negative terminal of the car battery. The terminal will be marked with the symbol “–”, so it is easy to be located. With the negative terminal cable set aside, you can begin the mounting process.
Some cars come with a designated space for an amplifier, while others do not. In case there are no existing factory holes to fit the amplifier, you will need to drill it yourself. The holes will be drilled right where you marked the amplifier mounting location.
You can use your power drill for this. The steel drill bits used should be at least 1/8th of an inch smaller than the mounting screws.
The edges of the drilled holes should be coated with a layer of protective paint to stop any rusting.
If this is your first time, do not fret. All you need to do is tightly hold the drill parallel to the marked space. As you start drilling the holes, apply some pressure bit-by-bit. However, refrain from applying too much pressure to avoid any unwarranted damage.
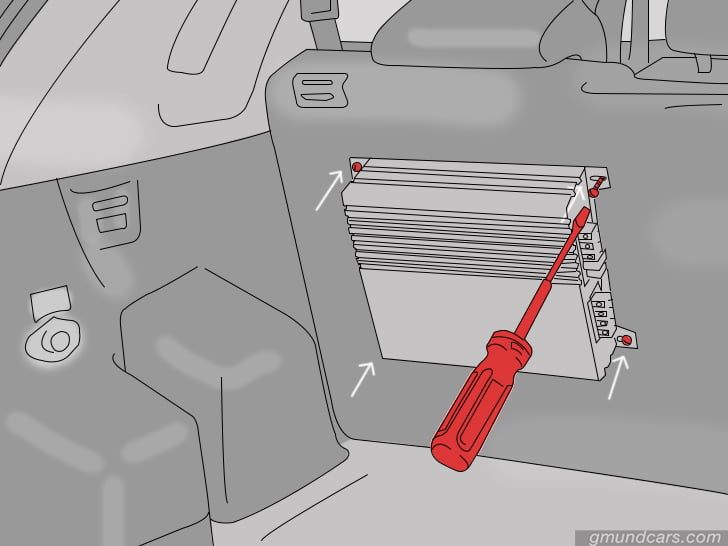
You should position the amplifier in a way that its mounting holes align with the drilled holes. The screws are twisted through the holes by hand. Then, tighten the screws with a screwdriver and make sure they are not coming out.
Before mounting the screws, use rubber grommets if you have any. Rubber grommets make sure that the screws do not move around once they are tightened to mount the amplifier.
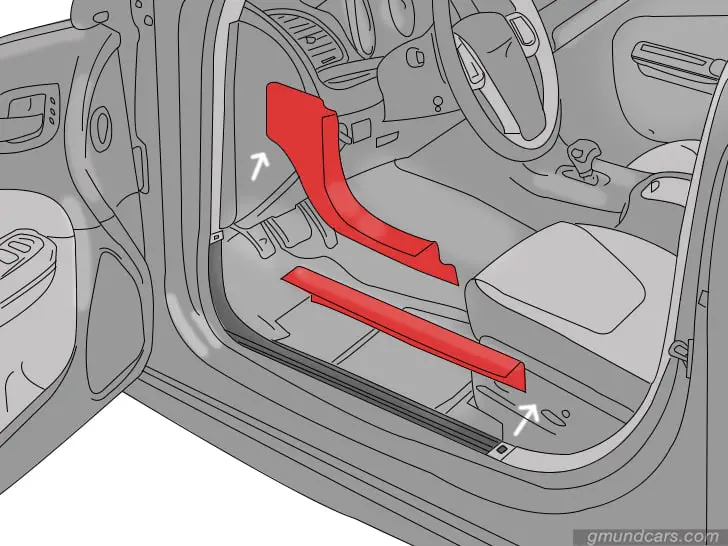
The interior trim panels may be disassembled so you can see the wires underneath. These panels are placed along the lining of the car’s floor.
You can remove the interior trim panels either by unscrewing them or prying at them with a trim prying tool. In case you are using a prying tool, just slide it underneath the panel. To pop off the panels, raise the handle of the prying tool, and you will be good to go!
Other panels that should be removed if present include the pillar trim panel and the kick panel. Pillar trim and kick panels are designed to be removed. So, look for any screws or pry out retaining clips to disassemble the panels.
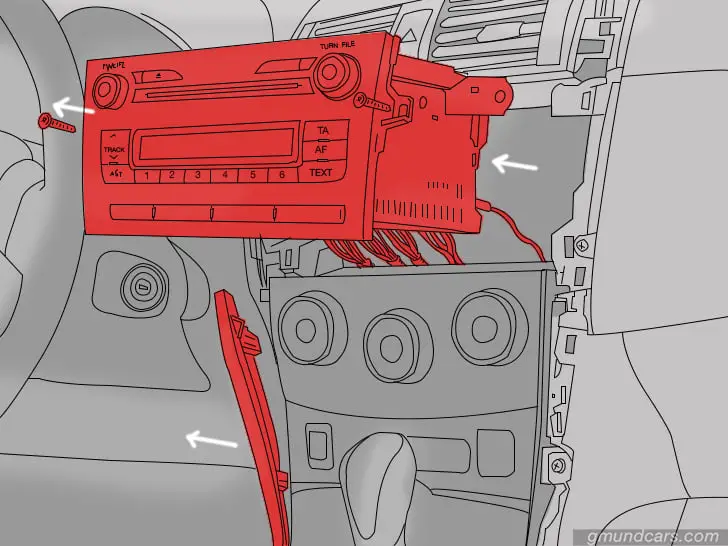
Panels have to be removed to take out the stereo head unit to see the wiring running through it.
First, you have to unscrew the screws on the panels. Once the panels are loose, slip in the prying tool underneath the stereo trim panels. From here on out, the instructions are the same as those for removing the interior trim panels.
With the amplifier mounted, your next job is to install the proper wiring. You have to route the power wire, ground wire, remote wire, and speaker wires.
Let’s get started!
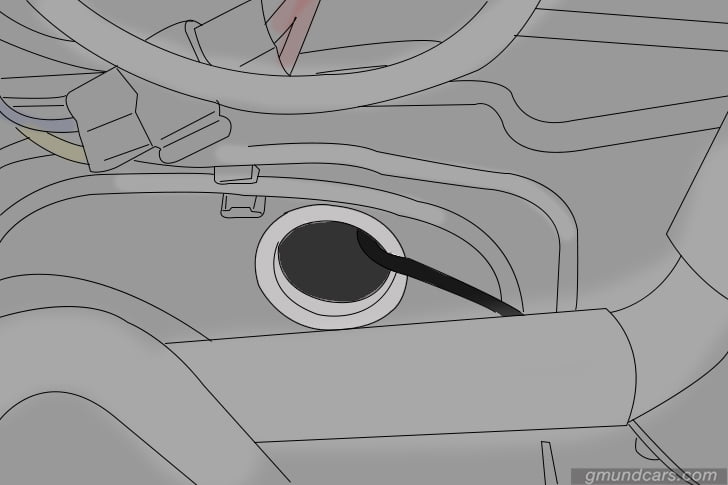
You need to look for a hole to run the wire through the firewall to the amplifier. A firewall is what you call the metal panel that separates the engine from the passenger compartment.
The hole can be either unused or one that already has wires but with enough room for the power wire. To find the hole, first look for the battery on the driver’s side. You can check the footwell for the hole as well. The footwell is on the same side as the battery.
In case you do not find any holes in the firewall, you can always drill one. Your steel drill bit will do fine for drilling through the metal panel.
Before you start drilling, make sure you are not drilling through any important wires in the engine bay.
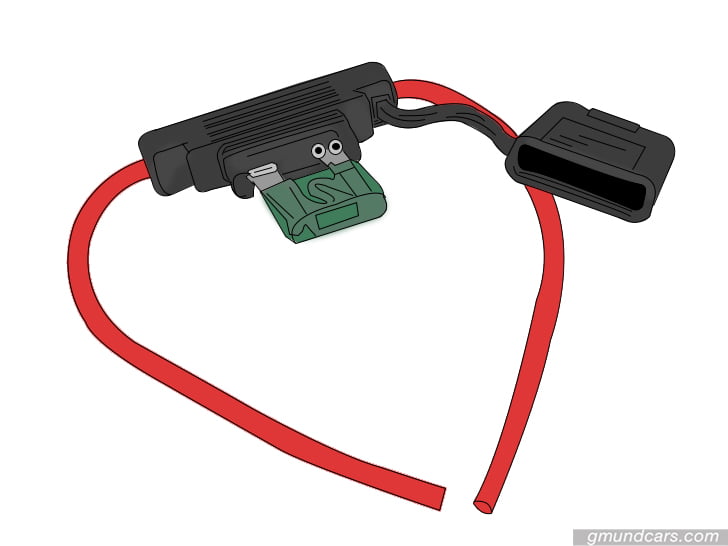
This step is for those whose power wire does not come pre-installed with a fuse holder. A fuse holder prevents a fire in case the wire short-circuits. The fuse is placed close to the battery while still maintaining a distance of 6 inches or less.

Nilight Inline Fuse Holder
You can anchor the fuse holder with a cable tie or a screw, so it does not get loose.
After that, cut a short piece from the end of the power wire. This will be used to cover the distance between the fuse holder and the battery.
With a wire stripper, strip the insulation from the ends of the newly cut power wire. Your wiring kit should have a ring terminal. So, crimp that to one end of the short wire and attach the other to the fuse holder.
You should also strip the insulation off the power wire leading to the passenger’s side. It is then connected to the other end of the fuse holder.
You need to run the power wire by feeding it from the interior of the car. The power wire is typically red, although the colour varies depending on what installation kit you use.
To run it, pull back the carpet lying along the driver’s side. The rocker and kick panel should have been taken out for this.
How you connect the power wire will depend on how the amplifier is mounted.
For a top-mounted battery, crimp the ring terminal onto the end of the power wire. First, remove the battery terminal’s nut. Then, slip the power wire’s ring over the blot securing the battery terminal to the battery post. Last but not least, you replace the nut.
You can use terminal adapters for side-mounted battery posts.
In your wiring kit, you may find a wire loom. A wire loom acts as added protection for your wires against heat. It is cut to the right size to correctly thread the power wire until it reaches the firewall. To secure it, just thread the wire loom over the short wire between the fuse holder and the battery.
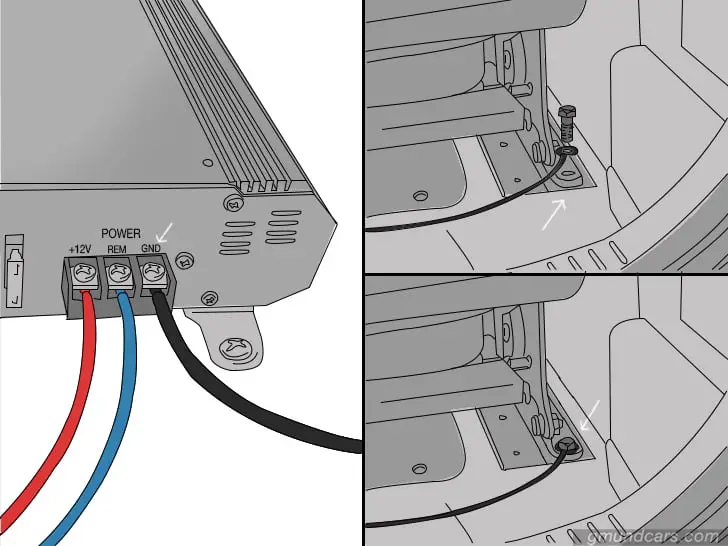
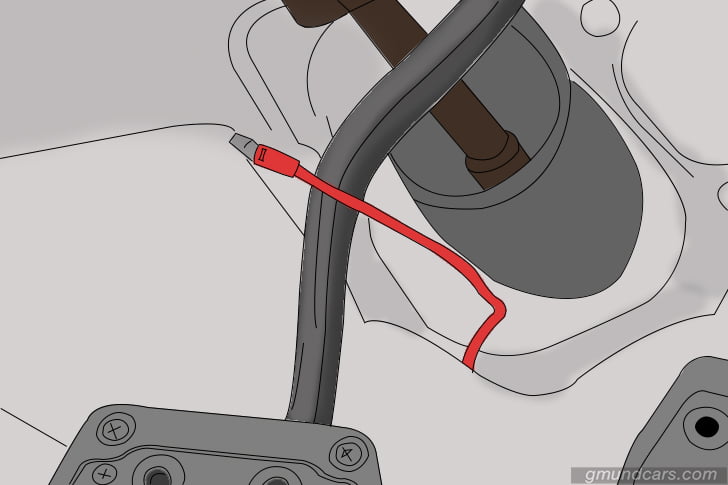
The ground wire is perhaps one of the most important connections for your amplifier. So, make sure to follow the instructions to the dot!
You can begin by looking for a bolt or screw on the car’s metal frame, as close to the amplifier as possible. In case you cannot find one, drill a hole for it and bolt it yourself. However, ensure that you do not accidentally drill any existing wires or lines.
Once you finish drilling, compress a ring terminal to the ground wire. The bolt location is cleaned thoroughly, so the ground wire connection is to the bare metal. As a last measure, bolt the terminal to the car’s metal chassis tightly.
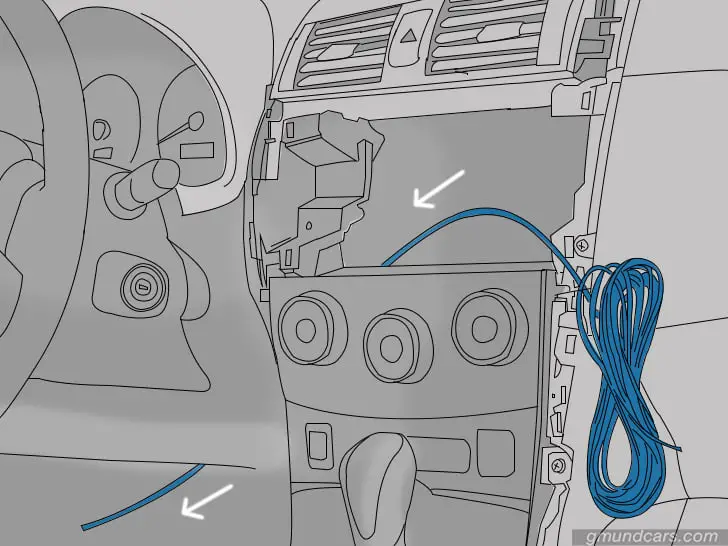
The remote wire is usually blue and white. It goes behind the stereo. So, you will feed this wire through the hole in the dashboard behind the stereo. You keep feeding in the wire until you see it coming out from the foot-well below.
After this, both the remote and power wires are lined up together to tuck them in. They are tucked along the same side that is covered by the interior trim panels.
It is important to remember to run the wires of enough length that they can reach the amplifier.
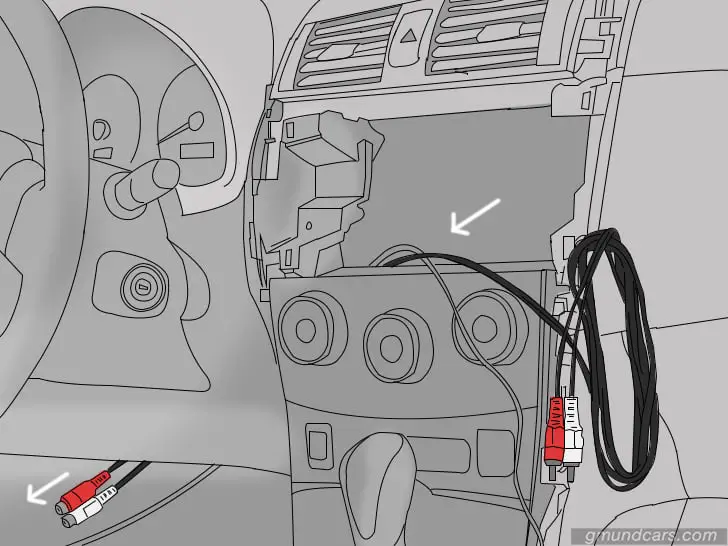
There is an easy way to identify RCA cables. They are blue or silver in color with red and white inputs attached to each end.
Before running the RCA cables, make sure to do so on the opposite side of the power wire. This is to avoid any future amplifier problems.
The process of running these cables is the same as remote wires. You push it through the hole in the dashboard, and eventually, it will come out of the foot-well. It is pulled until it reaches the amplifier.
You need to ensure that the RCA cable runs along the side of the vehicle. The side should usually be covered by one of the trim panels you took out earlier.
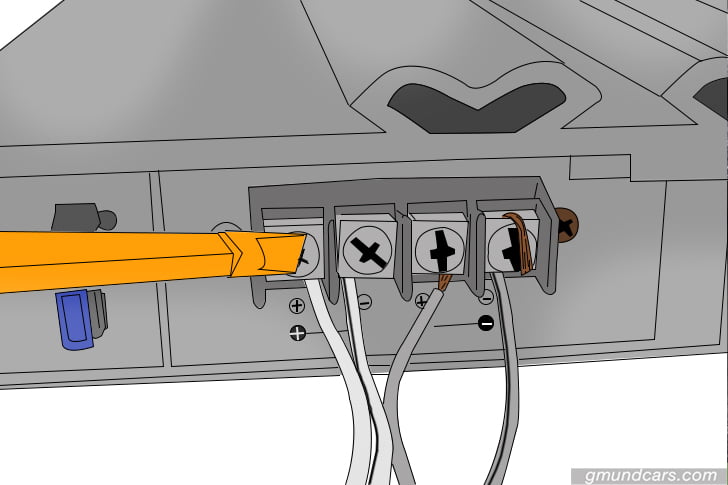
The speakers receive the music through the amplifier. So you run the speaker wires from the amplifier output and attach them to the speakers. Before doing this, take out any old speaker wires if still attached.
Another thing to remember is the polarity of the speaker wiring. You must keep in mind that the amplifier’s positive terminal will be connected to the positive terminal of the speaker. The same principle applies to the negative terminal connection. This ensures that the speaker will sound right during the time of use.
You may need to take out some more trim panels. This is in case the speaker wires cannot be pushed in the already open panels.
Now let’s come to the part of making the connection that will power up the amplifier. Take a look at the steps below to accomplish this.
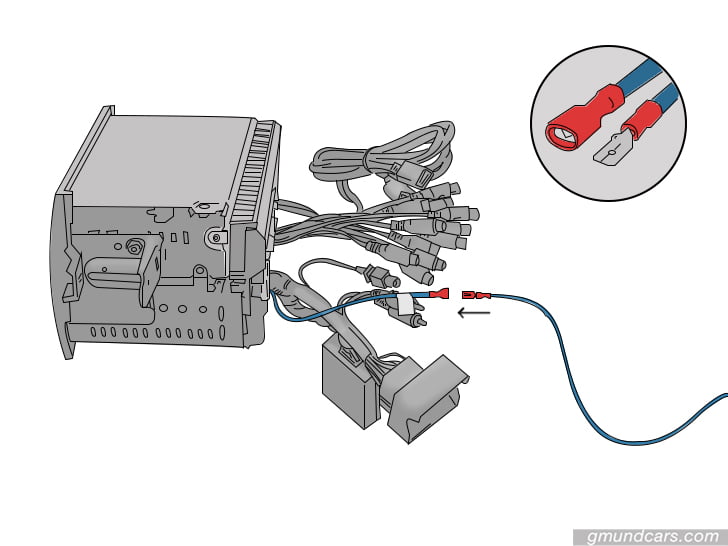
For this, make sure you have the turn-on wire – a blue and white wire attached to the stereo.
The turn-on wire remains plugged while you remove the insulation from its other end. ½ of an inch will be enough.
A butt connector is slid onto the end of the turn-on wire. This hollow tube is used to connect the turn-on wire to the remote wire. So, the remote wire is pushed inside the other end of the butt connector. To ensure a strong connection between the two wires, crimp the butt connector with a wire crimper.

The ports for RCA cables are available behind the stereo system. They will be marked in red and white, making it easier for you to distinguish.
Once you identify them, plug the red cable into the red port and the white cable into the white port.
As a final check, push the RCA cables into the port to make a firm connection.
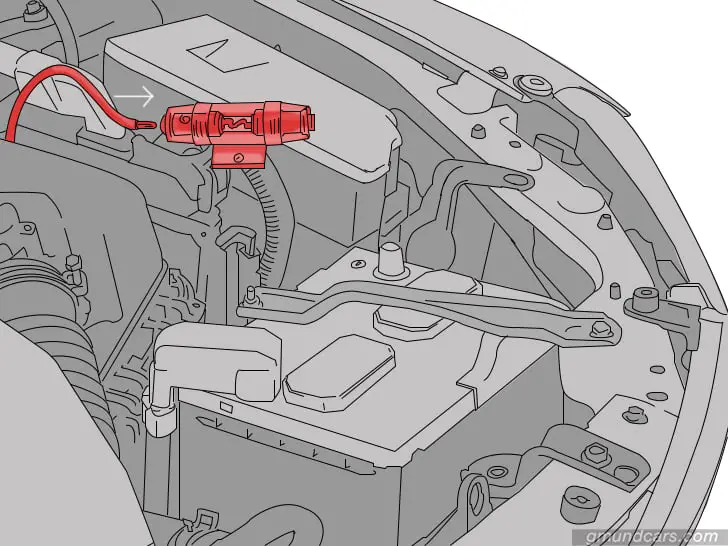
This in-line fuse is just a measure put in place to prevent the risk of fire. If possible, use an in-line fuse with 30-amp. To attach the in-line fuse, you will need a fuse holder as well.
The fuse holder is slid onto the end of the power cord inside the engine. Then, screw it in, so it holds a secure position.
You should keep pushing the in-line fuse inside the holder until you hear a click sound. The last step is to connect another power wire to the other end of the fuse holder. With that done, you can finally tighten the screws in.
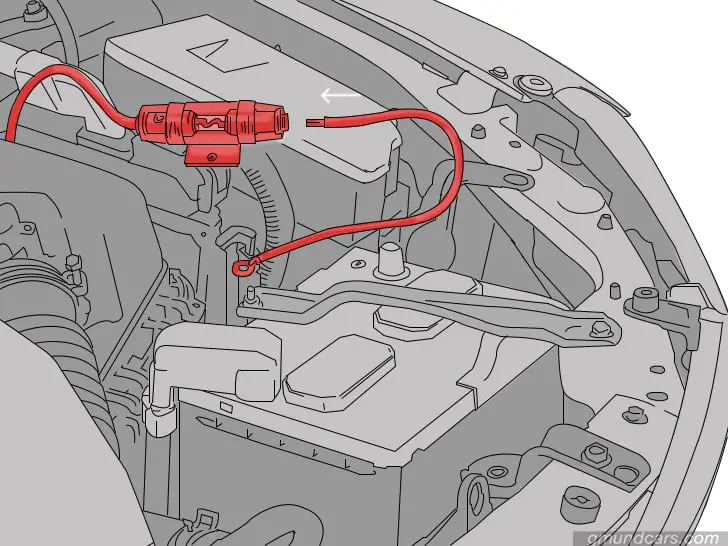
There should not be any exposed wires coming out. That is why a 10-gauge ring terminal is used to cover the end of the power wire. A pair of wire crimpers will help in securely positioning the ring terminal on the power wire.
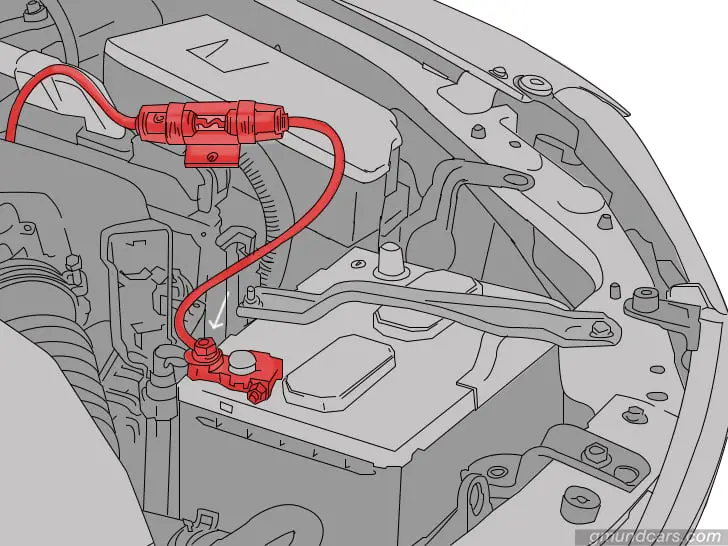
4-5 inches of the power wire is pushed in through the inside before you pull it from the outside. You should pull a few inches of the wire from the engine bay so it can connect to the battery. It is attached to the positive terminal of the battery.
First, loosen the positive terminal so you can remove it. Then, add the ring terminal to the battery port. The positive terminal is put back in its place tightly. There should be firm contact between the positive terminal and the ring terminal.
The next part in attaching the amplifier to the car is adding it to the stereo system. Let’s check it out.
You have to access the speaker wiring to connect the stereo output with the amplifier input. That is why you disassemble the radio – to see which wire is going to which speaker.
Positive leads are usually solid coloured, while negative ones have striped colours. However, this can vary with different cars.
Once the speaker wires have been identified, cut the ends of each. The end from the radio plug is then fed to the amplifier’s input.
You can then connect the ends going to the speaker to the matching wire coming from the amplifier’s output. This is done with the help of a connector.
The amplifier filters and gains are two critical components that determine the quality of audio in your stereo system. The gains, when correctly adjusted, reduce any distortion or disturbance in the quality of the sound. While the filters are essential, they can pass higher or lower signals than the required minimum or maximum value.
Here is how you can set your amp’s filters and gains.
Start by switching off the stereo, followed by disconnecting RCA cables. Without playing any music, turn the volume all the way up on your system. Turn the radio equalizer to “flat.”
You can then switch on your amp’s gain and switch crossover filters off or full-on it along with bass boost at zero. Plug the RCAs back in and adjust the gain until all distortion is gone from the audio.
Pick LPF or low-pass filter for subwoofers and a high-pass filter for speakers. Choose the full or off position and ignore the tuning. If you have picked HPF, then you will be aligned at the lowest frequency on the dial.
On the other hand, if you select LPF, the frequency dial alignment will be at the highest frequency.
Boost the bass depending on your liking. You might have to try a few times to get it right, as all subwoofers have different capabilities.

Once it is all aligned, you can play music between 80% to 100% volume and turn the gains back on. After this, you will have to check if there is still any distortion. You can switch up the tuning to remove the distortion after this.
You can reconnect the wires and connect the amplifiers. Make sure not to exceed 80% volume on your speakers when you are listening to the radio!
No need for a mechanic, you can install your car amplifier by yourself. That’s what you can do after reading this guide.
The important thing is you must get to know your car’s inner workings and the necessary wiring structure. This proved to be wholly beneficial when it comes to your car audio installation.
Now, what are you waiting for? Let’s do it on your own!
1. Can I connect 2 speakers to 1 channel?
Yes, you can connect two speakers to the same amplifier. You can choose to either connect them in series or parallel. You can connect them in parallel if the impedance of both speakers is more than 8 ohms. While if it is less than 8 ohms, it would be connected in series.
2. Can I use 2 amplifiers on the same speaker set?
It is possible to use 2 amplifiers on the same speaker set too. It can be a little tricky at first. This is because if you connect both amps directly to the speaker set, there is a high chance of you frying at least one of the amps. You will need to use a special speaker switch along with the two amps and speaker set to keep your equipment safe.
3. Is it better to bridge an amp?
If you are using your amplifier for just a single speaker, bridging it is a great option. This is because bridging an amplifier will increase the power supplied to the speaker. However, if there are other speakers involved, you might need a separate amplifier for them.