Do you need to untighten some nuts?
With a socket wrench, you will be able to turn all the nuts and bolts around your place with a lot more ease. Tired of refitting the wrench every turn of the bolt? Well, the socket wrench’s ratcheting feature eliminates this by keeping the wrench connected to the bolt the entire time!
Pretty handy, right?
Once you’re done reading this compact yet comprehensive guide, you will wield the socket wrench like a professional!
Let’s get started!
What is a socket wrench?
Before we get started on how to use a socket wrench, let’s brush up on the basics and see what a socket wrench is in the first place!
A socket wrench, also known as a ratchet, is a pretty handy, simple hand tool used to turn nuts and bolts. What makes it different from a regular wrench is its ratcheting feature.
The ratcheting system of the wrench is attached to its handle. With the help of this amazing attribute, you don’t have to refit the wrench every time you turn the bolt.
All you need is to push or pull the handle when the socket fits around the fastener.
This is instrumental and highly valuable when the space you are working in is limited.
Step-by-step guide to master a socket wrench
Now you know what a socket wrench is. Let’s jump into learning how to use it properly!
Step 1: What is your socket wrench’s drive size?
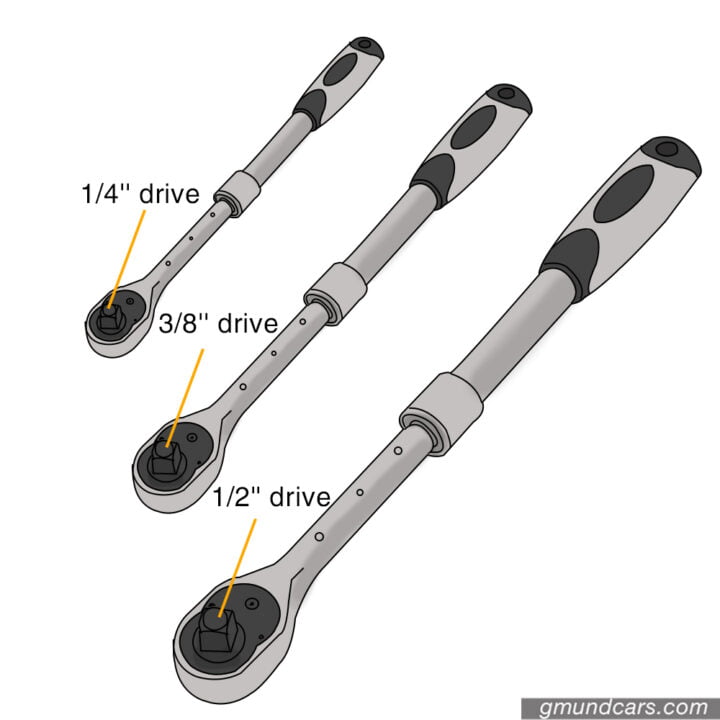
Not all the nuts and bolts are of the same size – this means that you cannot use one socket wrench for everything.
Ratchets come with different drive sizes and they are meant for various purposes.
- 1/4″: Useful when you are doing precision work.
- 3/8″: This is the most useful size and can do most of the odd jobs around your home. The ratchet is big enough that you need to apply quite a bit of force but isn’t so big that it doesn’t fit into tight spaces.
- 1/2″: Perfect for turning around nuts and bolts that are 10 mm or more in size.
- 3/4″ and 1″: Used for repairing some heavy machinery or fixing your truck.
Step 2: Choose the right socket
Selecting the right socket is the most important thing you need to do. If you own a socket set, you will see that there are dozens of them.
From deep and shallow sockets to 6-point and 12-point sockets, there is a lot of variants there, and you are bound to get confused, especially if you are a beginner.
Want to learn everything there is about sockets? Here’s an amazing article with all the details!
There are various factors that go into choosing a socket. Let’s see what they are!
Select a socket that fits your socket wrench
When you are choosing a socket, ensure that its drive size is compatible with your ratchet. The ratchet’s drive size must be the same as the socket’s drive size. Otherwise, you will require an adapter.
Select a socket that fits your nuts or bolts
The socket size you choose also depends on the fastener’s size. There are measurements(SAE or Metric) on the side of the sockets. Compare these with the size of the nut you want to turn, and then choose a socket that fits.
Don’t try to turn a bolt with a socket that doesn’t fit since doing this can damage the fastener’s head, and then the nut will be impossible to turn.
Measure Nuts or Bolts Size by Gauge

The best thing would measure the nuts or bolts with the help of a gauge. This is pretty easy. All you need to do is place the head into the nut & bolt gauge. Find the hole in which the bolt head or nut doesn’t wiggle.
The size of the hole will be stamped on the gauge – all you need to do is take a look at it and Voila!
After knowing your nuts or bolts sizes, pick the corresponding socket sizes by looking at their markings. Pretty easy, right?
Hit and trial Method
If you don’t have a gauge or the fastener’s position does not allow you to use one, you can go with the hit & trial method. Grab a socket that looks as if it will fit. If it is too tight, pick one that is a size larger. Keep trying until you find the perfect fit!
Note: It’s ideal to use SAE sockets for SAE fasteners & metric sockets for metric fasteners. But if you don’t have the right one, break the rule by using the SAE to metric conversion chart! However, you will be more likely to slip and round off the fasteners. And that is something you want to avoid!
Recommended sockets for DIY beginners
Are you a DIY- beginner and don’t know which sockets to get? It is a great idea to buy ones that will be useful for multiple jobs around your house.
The following sockets’ sizes will cover 90% of tasks around the house and DIY automotive repair.
- 6 point metric deep impact socket: 10, 11, 12, 13, 14, 15, 16, 17, 18, 19 (mm)
- 6 point SAE deep impact socket : 3/8, 7/16, 1/2, 9/16, 5/8, 11/16, 3/4 (inch)
Why 6 point?
Why deep?
Why impact?
However, keep in mind that you may encounter situations when you need other socket types and sizes as well.
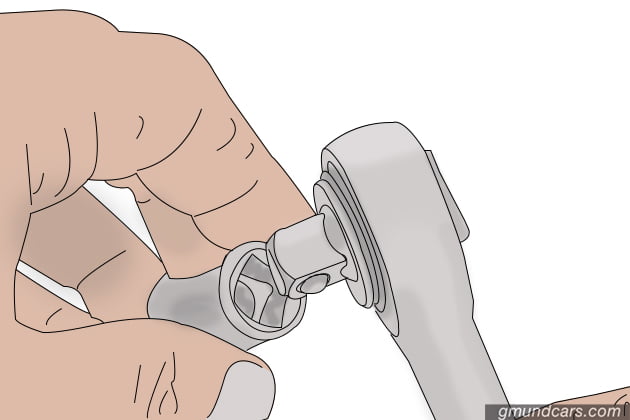
Step 3: Attach the socket to ratchet
Once you have selected the perfect socket for your job, comes the next step: Attaching the socket to the ratchet.
If you look closely, you will see that the socket has a square hole. Moreover, there must be a square knob on the handle as well.
If you have a round head ratchet
Just pull it out when you want to take it off.
If the socket has a side hole instead of an internal groove or notch, you need to line it up with the ball bearing on the ratchet’s drive square.
If you have a pear head ratchet
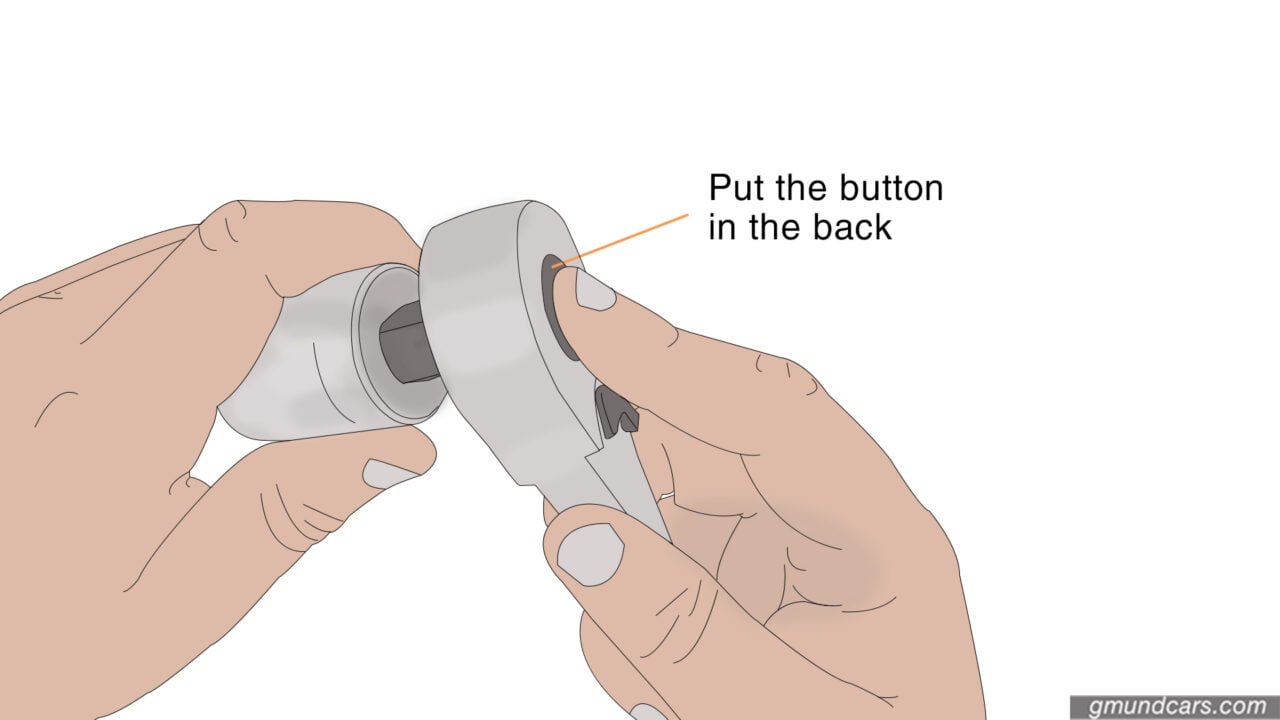
Pear-head ratchets usually have a button on the back of the head to release the ball bearing. To attach the socket on the square drive on the ratchet, press the button.
When you take the socket off, press the button again.
Other than that, attaching the socket to the ratchet is the same as that of the round head ratchet.
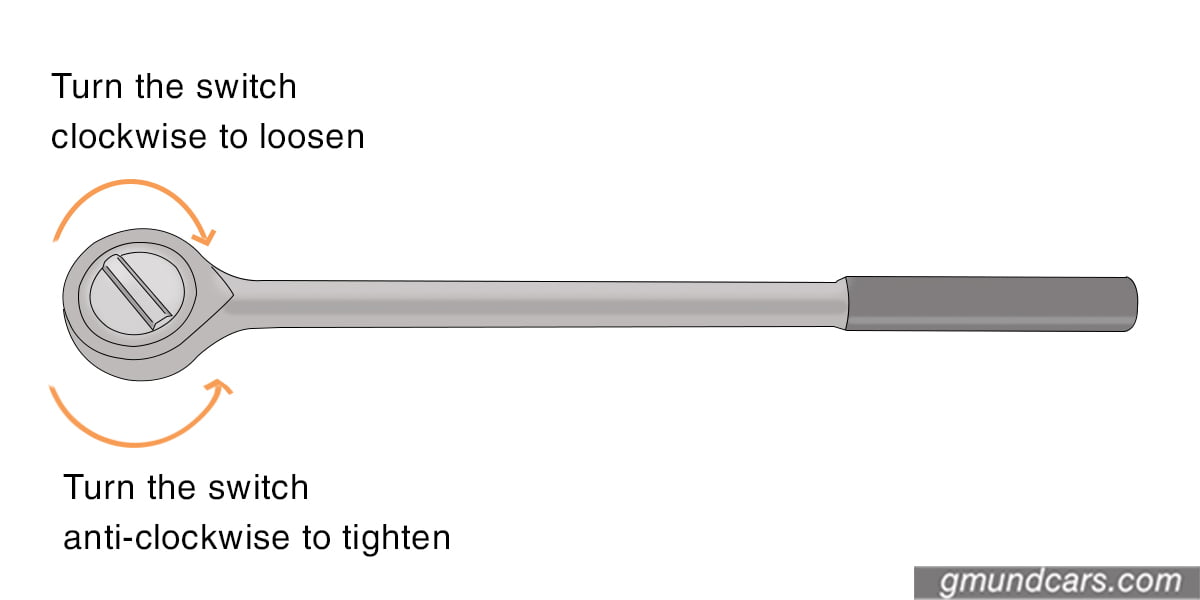
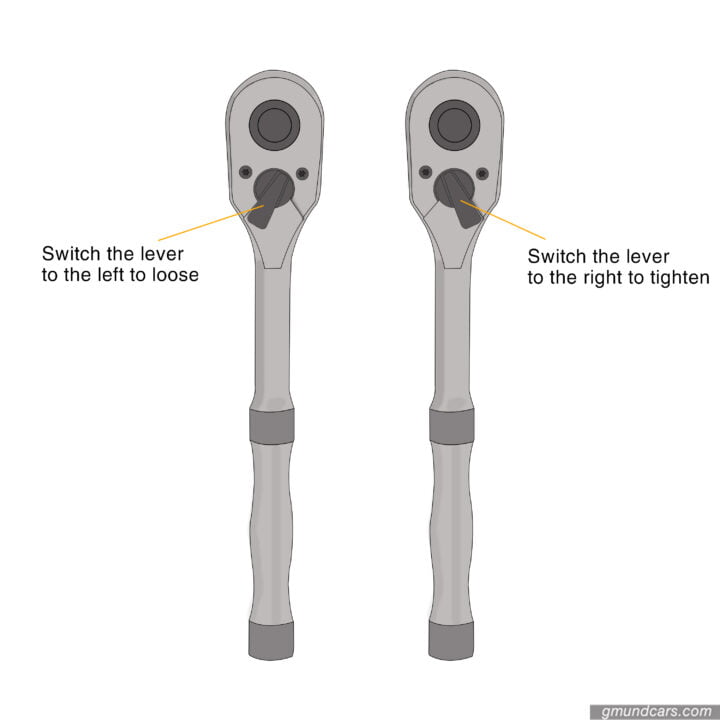
Step 4: Check turning direction
Easy so far, right? Now you need to check the turning direction to ensure that the bolt can move the way you want.
How to do that? It’s pretty simple. All you have to do is turn the dial switch or the lever on the back of the ratchet head in the opposite direction. Voila!
The style of the ratchet heads determines how the ratchet switches direction.
If you have a round head ratchet
If you have a pear head ratchet
Step 5: Turn your nuts or bolts
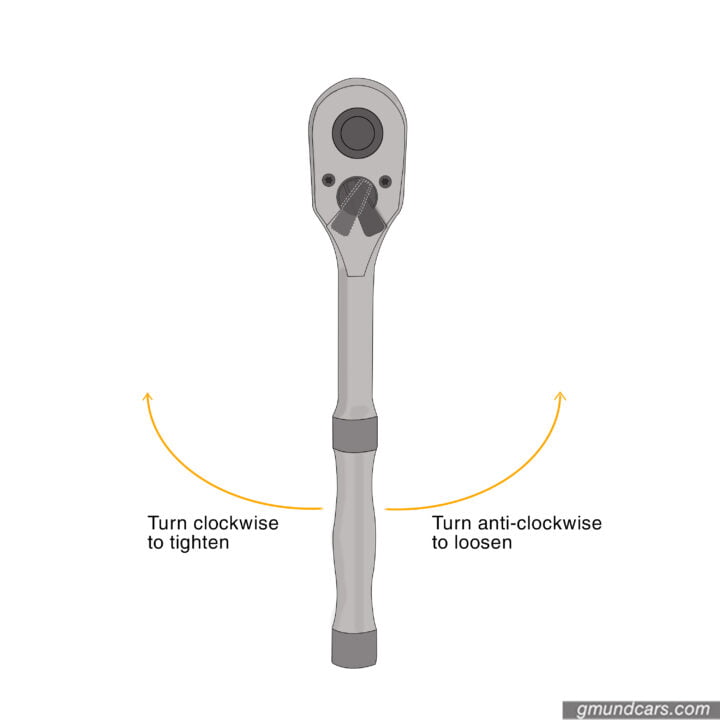
Now is the time that we all have been waiting for – turning the nuts or bolts! Line up the socket head with the nut or bolt you want to turn and get it in position.
- Tighten: turn clockwise
- Loosen: turn anti-clockwise
Out of room to swing the handle? You can rotate the handle in the opposite direction. When you do that, you should hear a “click” sounds. The ratchet mechanism will not turn the fastener or the socket, and you can easily reposition the handle to get started again!
Safety tips
You don’t want to ruin your socket wrench or damage it while using it, right? Therefore, you need to learn a few things that you should NOT do when using the wrench.
- Don’t use leverage extension on the wrench handle.
- Make sure that the nut is fully seated before you cock the wrench.
- Don’t expose the wrench to heat.
- If the handle is damaged or bent, don’t use it.
- Never use the socket wrench on moving machinery.
Outro
No one likes to flail around blindly without guidance! Our guide ensures that you know how to use a socket wrench properly without wasting your time or causing any damages.
Happy Fixing, People!
FAQs
1. How to use a socket wrench to tighten a lag bolt?
Tightening a lag bolt is similar to tightening any other bolt with the help of a socket wrench. Go through the instructions that we have provided above and tighten the lag bolt within minutes!
2. What can I use instead of a socket wrench?
If you don’t have a socket wrench, you can use a regular wrench to complete the task. However, if you don’t have a wrench at all, then you can use metal clamps, duct tape, two coins, zip-ties, etc.
However, we will suggest that you don’t use anything other than the proper tool while fixing things around the house.
3. How to remove a stuck socket?
Have a socket stuck to the bolt? Don’t worry, you can remove it easily. If you had already removed the bolt, you need to thread it back into the hole a couple of times.
Firmly grasp the ratchet handle. Try to keep the bolt steady with your other hand. Lift the handle up and then push it down again.
Repeat this up and down movement until you remove the socket off the bolt.