A multimeter and a voltmeter are instruments utilized for making electrical and electronic measurements. They enable you to assess almost all aspects of an electrical or electronic system. These devices are commonly used by car owners, electrical and electronic engineers, and physicists in their respective fields.
While a voltmeter measures the possible difference between two sections of an electrical current, a multimeter determines the resistance, current, capacitance, and frequency. You can use a multimeter in place of a voltmeter, but a voltmeter cannot replace a multimeter. Read on to learn more differences between voltmeter and multimeter.
What Is A Voltmeter?
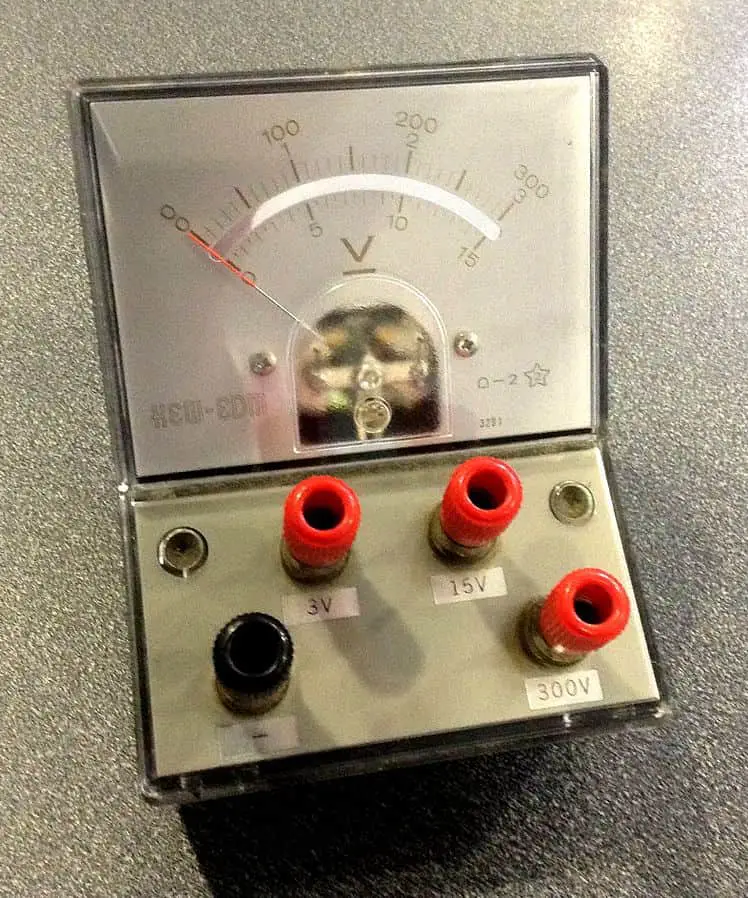
Credit: commons.wikimedia.org
A voltmeter or voltage meter is a device that determines the voltage or possible difference between two points of an electrical or electronic circuit. Often, the voltmeter determines direct current (DC) circuits or alternating (AC) current circuits. Advanced voltmeters also help determine radio frequency voltage.
Voltmeters calculate voltages that are often registered in kilovolts (1,000 volts), millivolts (0.001 volts), or volts. A voltmeter is attached in parallel to an object to calculate its voltage. This configuration is vital because devices in parallel often undergo the same possible difference.
Voltmeters also feature immense resistance, which inhibits current circulation across them. This process allows the device to record precise voltage readings. Many voltmeters available today are digital, but you can also find analog types.
Digital types are more accurate than analog types. As a result, many people prefer them. A voltmeter is usually one section of a multimeter, making it cost-friendlier than the multimeter. While voltmeters are ideal for household appliances, electrical engineering, and electrical works, you can use multimeters in any field.
What Is A Multimeter?
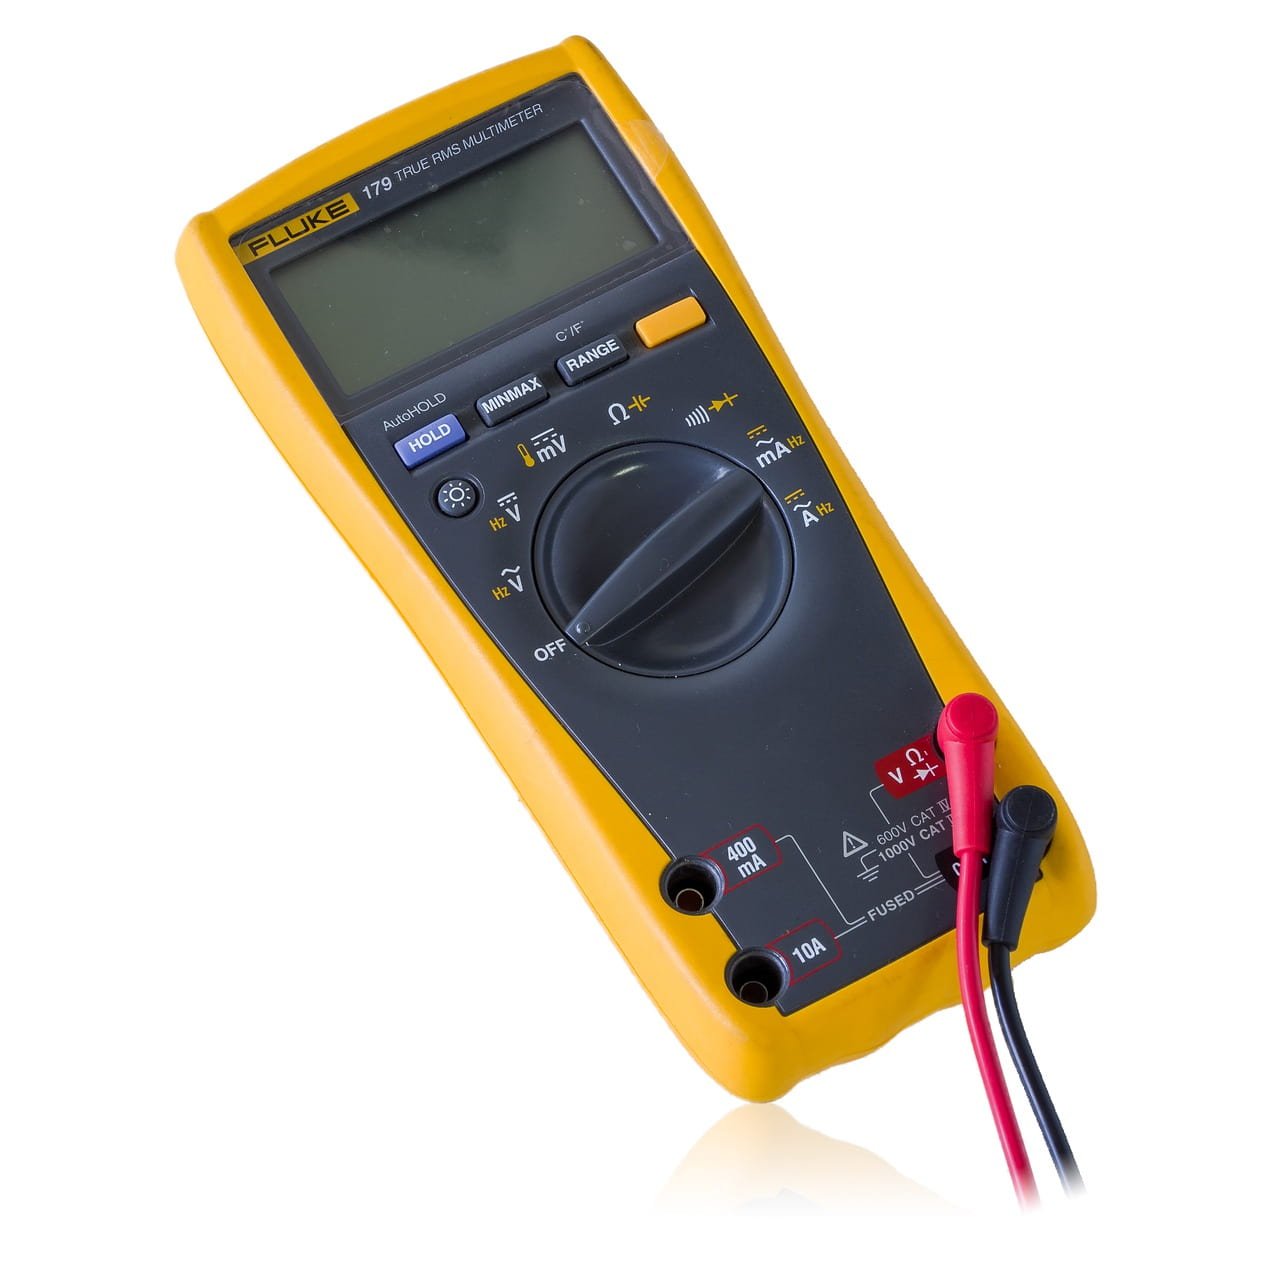
Credit: pixabay.com
A multimeter, also known as a multitester or a volt-ohm-milliammeter (VOM) is an electronic assessment device that conducts various measuring tasks in a single unit. The multimeter measures resistance, current, and voltage. You can also use this tool to assess flow among two points in an electrical circuit. Multimeters are classified into digital and analog types.
Analog multimeters come with a microammeter with an operational pointer that indicates the readings. Digital types feature a numeric display. They can also demonstrate a graphic bar showing the calculated value.
The popularity of digital multimeters has been rising tremendously due to their high precision and low cost. However, many people prefer analog multimeters in some cases, such as monitoring a fast-changing value. Different types of multimeters are available at varying prices. Here are some safety tips to remember when using a multimeter.
- Ensure the probes and leads are well insulated before using the test leads.
- Both alternating current and direct current can be overly dangerous.
- Beware of current shift between hands should an electric shock occur.
Read more: 5 Best Multimeters For Automotive [2022 Review]
Voltmeter And Multimeter Comparison
Potential difference, resistance, and current are core parameters affiliated with any electrical or electronic circuit. Users can calculate these parameters using suitable tools. As we have learned above, a voltmeter is an electrical tool that you can use to determine the likely difference between points in an electronic or electrical circuit.
Measuring the current through an ammeter is possible, but you have to establish current and voltage to calculate resistance mathematically. Use a multimeter or diode to calculate resistance directly.
A multimeter can measure resistance, current, and the difference of an electrical circuit directly. Some multimeters determine other parameters like inductance, frequency, humidity, and capacitance.
Digital multimeters use the testing potential of the voltmeter to measure volts, the ohmmeter to measure ohms, and the ammeter to measure amps. These devices come with advanced options and unique features to meet the different needs of different people.
Similarities Between Voltmeter And Multimeter
While multimeters have the same characteristics as voltmeters, they are more advanced. Using the correct sensors and probes in the multimeter helps you extract more information, like temperature. Here are some of the key similarities between these two devices.
Multimeters and voltmeters are electrical tools, meaning they can only work well when electricity is circulating within a circuit.
- Both of them are available in digital and analog versions.
- They can help determine the possible difference between two electric circuit units in a millivolt or voltage unit.
Differences Between Voltmeter And Multimeter
As seen below, there are numerous differences between a multimeter and a voltmeter.
- A voltmeter only calculates the possible difference within two sections of an electrical circuit. However, a multimeter is multi-purpose. It measures a wide range of parameters, such as the possible resistance, difference, current, capacitance, and frequency.
- You will need to use a voltmeter together with an ammeter to determine an electrical circuit’s resistance. A multimeter determines an electrical circuit’s resistance directly without the need for a separate ammeter.
- While you can use a multimeter in place of a voltmeter, the voltmeter can’t substitute the multimeter.
- Voltmeters are usually not used to test transistors or diodes. However, multimeters can test both transistors and diodes.
- Voltmeters are available at customer-friendlier prices, but multimeters are expensive. Multimeters come with various parts to measure a wide range of parameters, explaining why they are costlier.
- A voltmeter’s area of operation is narrow, while multimeters come with a broad application area due to their ability to execute diversified functions.
Voltmeter Vs. Multimeter: Which One Should You Choose?
If you are using a voltmeter or multimeter for the first time, choosing the best for your needs can be challenging. Remember, both the voltmeter and multimeter use the same electromagnetic current interchange system to measure voltage. Further, both devices read volts.
To determine the best tool among the two, you must consider why you need them. While multimeters help execute numerous tasks, voltmeters perform only one task. The voltmeter is a voltage measuring meter that can feature a digital or needle readout.
Digital voltmeters are ideal for simple applications like evaluating the breaker box before exchanging a circuit blade or checking voltage on a socket. A multimeter is an extensive device that you can use to measure volts and other parameters like amps, ohms, and units of current and resistance.
Advanced multimeters can measure frequency, acidity, humidity, induction, and temperature. If you only need to determine voltage, then the voltmeter is ideal. However, the multimeter is the best option if your needs go beyond voltage.
Pros And Cons Of Voltmeter
Pros
- Digital voltmeters are easily programmable
- Offer excellent stability
- Fast
- Available in an automatic range
Cons
- Digital voltmeters have additional features, making them more expensive than analog ones
- The digital circuit limits their speed
- Identifying temporary voltage spikes can be difficult
Pros And Cons Of Multimeter
Pros
- Have a high accuracy percentage
- Can measure both direct current and alternating current
- Come in various small sizes
- The output can be connected with external appliances
Cons
- They are more expensive than voltmeters
- Damage may occur if you increase the voltage beyond the set levels
- The LCD has a battery and dims once the battery drops
Read more: Charging a car battery while still connected
How To Use A Multimeter
Every multimeter user should know how to operate the device to troubleshoot numerous electrical circuits and components. We will discuss how to measure continuity, resistance, and voltage with this device below.
Symbols And Meaning
● The Hold Button
This button holds the meter readings once you press it. It helps you remember what you were measuring and its precise reading. It’s located on the left-hand side of your device.
● AC Voltage
Identified as capital V, this feature helps users test voltages ranging from 100-240 AC at work or around the home.
● DC Voltage
This option helps users test batteries, indicator lights, and tiny electronic circuits. It is a single Capital V with three hyphens above.
● Continuity
The voltmeter produces a detectable tone once continuity is identified among two points. Continuity appears like a chain of extending arced parentheses.
● Hertz
This option determines the frequency of your equipment or circuit.
● Direct Current
This setting comes as a capital A with a road-like symbol above it. It is similar to Alternating Current, but it comes with current.
● Current Jack
This setting helps users measure current amps using a dedicated clamp connector or a red test lead. Look out for 10ADC to identify it but it’s only available on some devices.
● Range Button
This feature is used to switch between varying scopes of the meter. It has a Lo/Hi symbol.
● Common Jack
This setting should be used together with a black test lead in all tests.
● Brightness Button
This feature switches the display backlight from blurred to bright. To identify it watch out for a tiny image of the sun.
● Millivolts
The only difference between this setting and the AC Millivolts setting is that it comes with DC voltage.
● AC Millivolts
This setting features an mV symbol with a twisted line above the ‘V’. It helps users get a precise reading when testing a tiny circuit on the Alternating Current voltage.
● Ohms
This setting comes in handy when determining resistance. It appears like omega, the Greek letter.
● Capacitance
Some capacitors have stored electric charge, even when they are turned off. Discharge capacitors safely before determining their capacitance. Watch out for two Capital T letters facing one another horizontally.
● Diode Test
This option features an arrow pointing toward the right. It provides a reliable method of determining whether your diodes are effective or poor.
● Red Jack
This option is used in all tests apart from current. It features different measurement symbols or mAVΩ.
● Alternating Current
A clamp connector comes in handy when determining alternating current. It is a capital A with a twisted line on top.
How to Measure Continuity With A Multimeter
A continuity test helps you determine the presence of electrical connectivity between two objects. When an item is continuous, electric current freely flows point to point. Where there is no continuity, it indicates a break along the circuit, suggesting a poorly wired circuit, a damaged solder joint, or a blown-up fuse.
● Step 1: Discontinue Current Flow
Before starting the test, ensure there is no current flowing across the component or circuit you are testing. Please do so by switching it off, unplugging from the socket, and removing the batteries.
– Insert the black probe inside the COM port in the multimeter.
– Insert the red probe inside the VΩmA port.
● Step 2: Power the Multimeter
Switch the multimeter on and move the dial to the continuity mode.
Remember, some multimeters do not have the dedicated continuity mode. If you are using one that does not come with that mode, read the instructions on step 4.
● Step 3: Determine the Flow of Current
The multimeter will send current to one probe to test continuity to check whether the other probe will receive it. Assuming the probes are linked directly touching one another or via a continuous circuit, the test current will flow through. The screen will display a zero value, while the multimeter will beep to show continuity. Suppose the test current is not identified, which will indicate zero continuity. In that case, the screen will display open-loop (OL) or display 1.
● Step 4: Run a Continuity Test
You can execute a continuity test even if your multimeter does not come with the dedicated continuity test.
Place the dial is at the least setting on the resistance more. Here, the multimeter will send some current across one probe and determine what is transmitted by the second probe. If the probes are linked directly by touching each other or through a continuous circuit, the test current will flow across.
The screen will display a near-zero or zero value. Low resistance indicates the presence of continuity. If current is not detected, then that means there is no continuity. In that case, the screen will display OL (open loop) or 1.
How to Measure Voltage With A Multimeter
● Step 1: Plug the Probes
Insert the black probe in the COM port on the multimeter.
Insert the red probe in the VΩmA port.
● Step 2: Activate the Multimeter
Turn on the multimeter and turn the dial to DC voltage mode. Every setting at the dial indicates the highest voltage it can evaluate. For instance, suppose you want to measure over 2 volts, but not more than 20, then choose the latter setting. Where there are doubts, begin with the maximal setting.
● Step 3: Position the Black Probe
Put the black probe at the negative terminal and the red probe at the positive terminal and set your range correctly. Ensure it is not overly high or too low to get accurate results. For example, if your multimeter range is 9, you may get precise results.
● Step 4: Ensure Your Range Setting is Correct
If your multimeter range setting were correct based on the example above, your reading would be 9.42 volts. Changing the probes, in this case, will only display a negative reading.
How To Measure Resistance With A Multimeter
● Step 1: Stop Current Flow
Before beginning, ensure no current flows across the component or circuit you are testing. Please do so by switching it off, unplugging from the socket, and removing the batteries.
Insert the black probe inside the COM port in the multimeter.
Insert the red probe inside the VΩmA port.
● Step 2: Switch on Your Device and Set Range
Turn on the multimeter and move the dial to the resistance mode.
The Ω symbol represents Ohms, which determines resistance. Set the correct range for the resistance you plan to measure. Where there are doubts, begin with the highest setting.
● Step 3: Position Probes
Put one probe at each side of the component or circuit you are testing. Suppose the multimeter displays a near-zero reading, you have set the range too high, and you may not get accurate results. Switch the dial to a lesser setting.
If the range is overly low, the multimeter will display an open-loop or 1, suggesting it is either out of range or overloaded. While this will not damage the multimeter, consider increasing the capacity.
● Step 4: Read Results
Once you set your multimeter to the correct range, it should display a 1.04k ohms reading.
Read more: Bad alternator: signs to tell and what to do?
How To Use A Voltmeter
Symbols and Meaning
An encircled letter V in electrical or electronic circuit charts symbolizes the voltmeter, complete with two soaring lines. The two lines illustrate the two measurement points.
Using a Voltmeter
● Step 1:
Insert the probes in the meter; the black probe to the negative and the red probe to the positive.
● Step 2:
Move the switch or selector dial to the measurement type you want. For instance, to determine direct current on a battery, use DCV. To determine alternating current from a wall outlet, use ACV.
● Step 3:
Select your range setting, ensuring it’s the highest of the voltage you want to read.
● Step 4:
Turn the voltmeter on,
● Step 5:
Touch the probes from the insulated handles and place the red probe at the positive part of a DC circuit. You can also set it at each section of an AC component. Place the black probe at the other end.
● Step 6:
Read the display results.
FAQs
- Does a voltmeter have polarity?
Yes. A voltmeter demonstrates polarity from the needle’s direction for the analog model and a numerical sign for the digital type. The voltmeter records voltage in the usual order on a negative black test lead and a positive red test lead. Suppose the enforced voltage is from a reversed polarity; positive on black and red, the meter will read anticlockwise.
- Is it safe to put a multimeter in an outlet?
Yes. When testing an outlet using a multimeter, consider adopting the right approach to guarantee safety. Remember, you will be executing tests on a live component. You can ensure safety by touching the two-meter probes in one hand. Doing so will protect you from shock. Ensure that no metal section of the probes touches or brushes one another, as that can trigger a hazardous short circuit.
- Why does my multimeter beep?
Because the DMM or digital multimeter usually beeps when a complete path or continuity is established. The digital multimeter will not beep when the circuit is open, or the switch is OFF. Remember, during a continuity test, the digital multimeter beeps depending on the amount of resistance on the component or circuit being tested.
Conclusion
Both the voltmeter and the multimeter provide a safe method of measuring electrical values. While the voltmeter only tests for voltage, the digital multimeter is ideal for testing various components and circuits. Voltmeters are cheaper than multimeters because the latter comes with multiple features. Whether using a voltmeter or a multimeter, understand the risks involved and adopt the correct usage measures to protect yourself from harm.