
Causes Of CV Joint Noise When Driving Straight
CV joint noise when driving straight does not mean your CV joint is damaged or needs to be replaced with a new one. The causes may be minor, requiring you to do small maintenance procedures like lubricating the system.
Below are some of the reasons why your CV joint makes unusual noises:
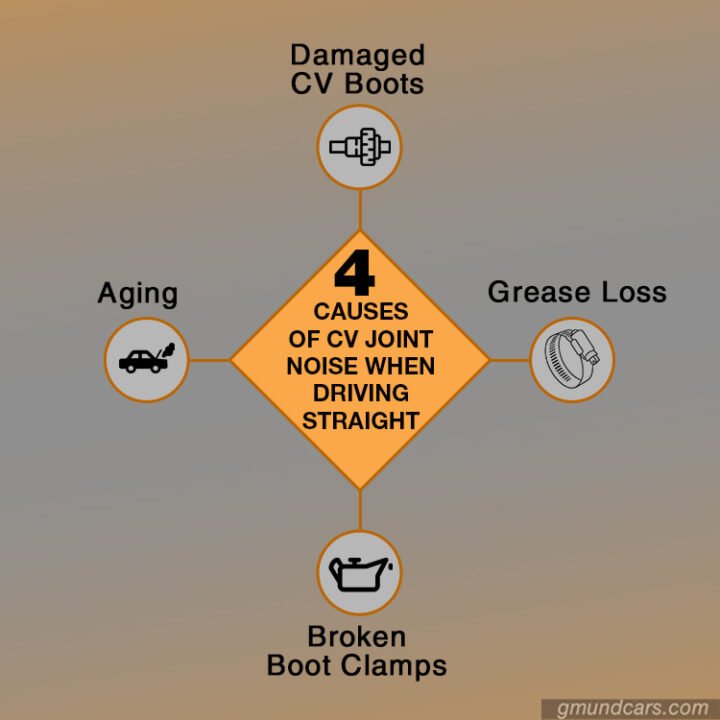
Damaged CV Boots
Constant Velocity joints are types of axle joints that can flex while still transferring the transmission’s driving force to the wheels. The joint is a delicate device that needs protection from harsh environmental conditions like dirt, debris, and water.
The CV boots perform the protective job by acting as a cover for the CV joint. The boots are flexible parts surrounding the CV joint and are made of a rubber material. The boots are ribbed to allow flex and bending of the CV joint. They ensure water, debris, and dirt are kept out of the joints to prevent damage to the system. Boots also help in keeping the CV joint special grease inside the assembly.
The joint grease will start to leak out of the CV joints if you have boots that are torn, faulty, damaged, or cracked. This accumulates debris, rocks, dust, dirt, and water deposits inside the joint system. Joint lubrication will be affected by the accumulation of inclusions and lead to corrosion, friction, and wear of the component.

Source: wikipedia.com
The accumulation will cause CV joint noises when driving straight at high speeds. Ensure to fix the issue as soon as possible since prolonged use of a faulty joint system will read to its eventual failure.
You will easily notice faulty CV boots since grease will flow out of the boots through a crack. You may also visually inspect the drive wheel area and the axle for any grease deposits that may have been scattered.
Broken Boot Clamps
The purpose of the boot clamps is to ensure the CV boots are kept in place. This way, the CV boots, and joints are protected from vibration and axle movements by keeping them still and unaffected by the various motions.
Broken boot clamps will be unable to keep the boots secure. You will end up with loose and damaged/ faulty CV boots that will crack/ loosen to let in debris and contaminants into the CV joint assembly. Moreover, the CV axle will get damaged over time if the broken boot clamps get replaced.
Visually inspect the boot clamps alongside the CV boots to see any looseness or breakages.
Grease Loss
The loss of grease in the CV joint will mean two things: you are losing grease due to a leak in the system, or the original grease is old and need replacements. A clear indication of grease loss as the primary cause is loud CV joint noises when you drive at high speeds. The noise will be less noticeable or non-existent when you drive at low speeds.
The noise caused by grease loss is due to a lack of lubrication that increases CV joint friction and prevents the joint from turning freely. The problem will lead to CV joint wear, which will eventually require a part replacement if not attended to quickly.
Aging
Aging is the natural process of any mechanical component in your vehicle. The CV joints are no exception. An old car with old CV joints is bound to produce some noises when driving straight since the part gets worn out from frequent use.
CV joints are one of the most durable components in your vehicle but are subject to environmental decay and aging. Any CV joint that is older than 180,000 miles is considered old.
Ensure you know how old the CV joint is before fixing the CV boots, boot clamps, or lubricating the system.
Read more: Broken Axle: Signs And Causes
How To Fix CV Joint Noise When Driving Straight
You will need several tools for this process to perform the repairs yourself. Experts recommend taking the vehicle to the mechanic shop since CV joint disassembly and reassembly is a fairly complex procedure.
You will not need to go through the mentioned procedures below if your issue is damaged CV boots or boot clamps. In that case, all you need to do is replace the faulty parts and add lubricating grease onto the joint.
If the cause is progressive damage to the whole system or CV joint old age, you can install a new CV joint. You need a new part since you can not repair a damaged CV joint.
Required Tools
The repair procedures for diagnosing and fixing faulty CV joints are complex and need specialized tools. Most of these tools can only be found in a mechanic shop, but you may opt to buy one if you are experienced and want to perform the repairs yourself. The tools include:
Step-by-Step Procedure For Fixing The Issue
You will need to put on your protective gloves and gear for this process. Arm yourself with your mechanical toolbox and ensure you have all the equipment you need for the procedure.
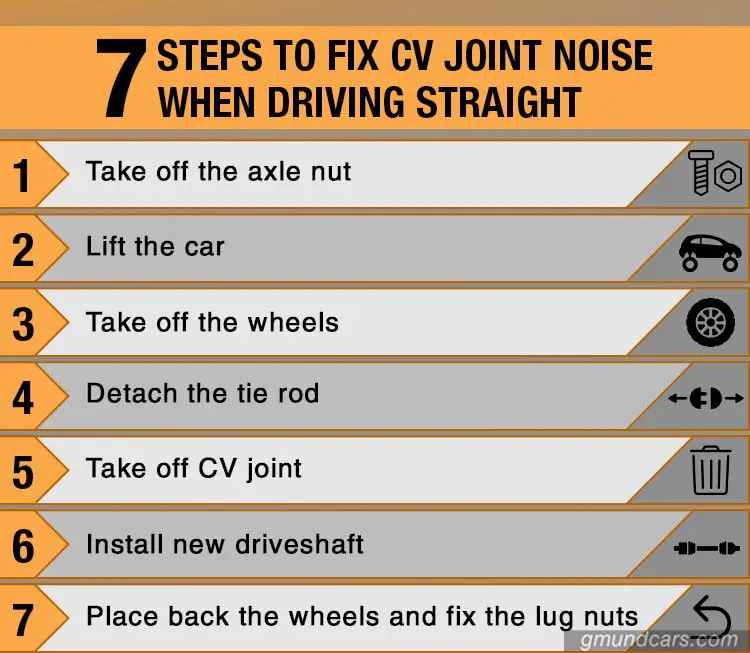
Step 1: Take off the axle nut
Different vehicles have various sizes of axle nuts. An axle nut socket set is handy since it comes with various axle nut socket sizes that fit different models. You will need to remove the axle nut before lifting your vehicle since it is safer.
Take off the cotter pin if your car comes with one and use the appropriate axle nut socket to remove the axle nut. Proceed to lift the vehicle once the axle nut gets removed.
Step 2: Lift the car
You will need a car lift or a jack to lift your vehicle. Either one of them can do the job. Pick the one you are comfortable with. Please ensure to look at the manufacturer’s manual to know where you should place the jack or the car lift to avoid any damages.
Set your vehicle in park mode and ensure the brake is engaged before lifting the car. Lift the car with your preferred tool and place the car on a jack stand.
Step 3: Take off the wheels
Use the appropriate torque wrenches to remove the lug nuts from your wheels. Some lug nuts may be stuck or tightly fitted, so ensure to use more force to loosen them up. You may need to bang on them a bit but make sure you do not damage the fitting assembly.
Remove the wheels once the lug nuts are out of the way.
Step 4: Detach the tie rod
You will get to see the brake caliper and brake rotor once the wheel gets removed — Proceed to lock the brake caliper at a certain position to keep it out of the way. Access the tie rod typically attached to the steering knuckle.
You may notice a cotter pin like one found over the axle nut, which you will need to remove. Proceed to remove the bolts that lie underneath to access the tie rod. Detach the tie rod to access the CV joint.
Step 5: Take off CV joint
A hub and strut need to get removed to get to the CV joint. Proceed to take the bolts attaching to the system. The CV joint should get exposed at this point. Take the screwdriver and pry the CV joint from where it’s connected to the transmission.
Some transmission fluid will leak at this normal point; use a bucket to collect the fluid.
Step 6: Install new driveshaft
Take the new driveshaft assembly with the CV axle and replace it with the transmission’s correct position. Ensure the new part gets placed in the same area you took off the old part. Take note of a clipping snap sound that will let you know the boot clamps are well-positioned.
Step 7: Place back the wheels and fix the lug nuts
The part gets replaced at this point, and all that is left is to work your way back. Please do this by putting back every assembly as you removed it by working backward. Ensure you reassemble the bolts as they were and put back the wheel with its lug nuts, axle nut, and cotter pin.
Read more: Torsion Axle Vs. Leaf Spring: The Similarities And Differences
FAQs
How Much Does It Cost To Fix A CV Joint?
The cost of fixing a CV joint will depend upon the damage extent and the vehicle model. However, you will typically spend between $180 and $350 on CV joint replacements and repairs. In most cases, you will need to purchase the CV joint kit with new clamps, lubricated boots, and the CV joint assembly.
Is It Safe To Drive With A Clicking CV Joint?
The driving capabilities of your vehicle will deteriorate with time the more you drive a car with clicking CV joints. The CV joints will wear out due to friction, reducing their ability to transmit the wheels’ driving force.
You will eventually end up with a vehicle that won’t make certain turns or move as intended. It is unsafe to drive such a vehicle. Ensure to have the issue repaired as soon as possible to save yourself some repair money and avoid driving issues.
How Long Will A CV Joint Last Once It Starts Making Noise?
The average time you can use a bad CV joint is between five and six months. However, this will depend on the type of vehicle you have. Different cars come with different CV axle designs and materials, increasing or reducing their average lifespan.
Some bad CV joints may last for a few weeks, while others may extend to almost a year.
Read more: CV Axle Boot: Overview, Signs, And Replacement
Conclusion
CV joint noises when driving straight are common issues that most drivers will experience at one point. The most common cause is faulty CV boots that crack to allow contaminants into the CV joint. The contaminants reduce the CV joint lubrication capabilities, which causes noise due to friction.
Experts recommend you take the vehicle to your nearest mechanic shop to fix the issue before the damage progresses.